Tag: UART

  • Hardware hacking, part 3: using my 5 V FTDI cable on 3.3 V UARTs without killing the board

    Hardware hacking, part 3: using my 5 V FTDI cable on 3.3 V UARTs without killing the board

    Part 3 of 7 in the Hardware hacking series. Part 1: updating the firmware on a Pinecil V2. Part 2: the bench I work on.

    My USB serial cable has an FTDI FT232RL in it and is sold as a 5 V cable. Most router and IoT consoles run their UART at 3.3 V, a few at 1.8 V. Feed a 5 V transmit line into a 3.3 V receiver and you are past what the chip is rated for. I would rather spend a few cents on resistors than find out whether a board survives.

    This is for boards I own, powered from a low-voltage supply. I have not opened the cable. The seller says 5 V and I expect the data lines are 5 V too, but cables that look alike can differ, so the meter has the last word.

    Two directions, two problems

    The diagram above is one I drew: the wiring order, the divider and the one wire that stays disconnected.

    A UART link crosses over: cable TX to target RX, target TX to cable RX.

    The cable receiving is the easy direction. The FT232R datasheet (version 2.07, Table 5.3, VCCIO = 5.0 V) gives an input switching threshold of 1.0 V minimum, 1.2 V typical and 1.5 V maximum. It says “switching threshold”, not VIH, so I don’t call it that either. Anything a 3.3 V device drives above 1.5 V reads as high, and the absolute maximum input is VCC + 0.5 V, where VCC is the chip’s own supply (USB, about 5 V). No shifting needed.

    The cable transmitting is the problem. Same table: output high is 3.2 V minimum, 4.1 V typical, 4.9 V maximum at 2 mA. The ESP32 datasheet (version 5.3, Table 5-3) shows what a 3.3 V part expects: input high tops out at VDD + 0.3 V, so 3.6 V. It is only an example where I can point at the number. Only the cable’s TX wire has to come down.

    A two-resistor divider

    The cheapest fix is 1 kΩ in series from the cable’s TX, then 2 kΩ from the target’s RX pin to ground, so the pin sees two thirds of what the cable drives. This is the check I ran:

    R1, R2 = 1000.0, 2000.0
    cases = {"Voh min": 3.2, "Voh typ": 4.1, "Voh max": 4.9,
             "5.0 V ideal": 5.0, "VCCIO max 5.25 V": 5.25}
    for name, v in cases.items():
        i = v / (R1 + R2)
        print(f"{name:17s} Vout={v*R2/(R1+R2):5.3f} V  I={i*1000:4.2f} mA")

    The screenshot is the real output of that script. The 3 kΩ load draws 1.07 to 1.75 mA, below the 2 mA the datasheet uses as its test condition for Voh, so those figures are a fair basis. The pair dissipates about 9 mW at 5.25 V, nothing for a 1/8 W resistor.

    At the target’s pin that is 2.13 V worst case, 2.73 V typical and 3.27 V at the maximum. A receiver that needs 2.0 V for a high passes, though not by much. The SN74LVC1G125 datasheet, for one, specifies 2 V at a 3 to 3.6 V supply. With 1% resistors the worst case is 2.12 V, with 5% resistors 2.06 V, and that assumes nothing else loads the pin. A pull-down on the target’s RX eats the margin, and so does a USB port that sags below 5 V. A receiver that wants 0.75 × VDD, like the ESP32, needs 2.475 V. It passes at 2.73 V typical and fails at 2.13 V. So the divider suits the usual LVTTL-style console receivers and is marginal for strict CMOS inputs. I would rather say that than call it safe.

    The image is page 18 of FTDI’s datasheet, with a red box I added around the Voh row of Table 5.3.

    I don’t use 2.2 kΩ and 3.3 kΩ even though they give a neat 3.00 V unloaded: at the minimum Voh they give 1.92 V, which fails even a 2.0 V input. The high end matters too. At the maximum VCCIO of 5.25 V (Table 5.2), my 1 kΩ and 2 kΩ pair with 5% resistors can put 3.61 V on the pin, just over that 3.6 V ceiling, and lower rails make it worse. With 1% resistors the worst case is 3.52 V, so I buy 1% parts. Speed is no issue: with 20 to 50 pF of pin and wire capacitance the time constant is 13 to 33 ns, against 8.68 µs per bit at 115200 baud.

    When I would skip the divider

    For a margin I can defend, a buffer is better. The SN74LVC1G125 is a single non-inverting buffer. Powered from 3.3 V, its inputs accept up to 5.5 V (recommended range, section 5.3) and 2 V counts as high. Cable TX goes into pin 2, pin 4 goes to the target’s RX, and pin 1 (OE, active low) is tied to ground. It works in one direction, which is all this wire needs. The supply comes from the target’s 3.3 V rail once I have identified it with a meter, or from a separate 3.3 V source with common grounds, and the datasheet recommends a 0.1 µF bypass capacitor across it.

    The TXS0108E is the bidirectional option. Its A port runs from 1.4 to 3.6 V and its B port from 1.65 to 5.5 V with VCCA never above VCCB, so the target goes on A, the cable on B, and OE goes high to the target’s 3.3 V rail. The only job I would give the cable’s red wire is powering VCCB, never the target. It is more chip than a console needs. A 3.3 V cable or adapter removes the problem entirely.

    A 1.8 V target is a different case, and I look for it before I wire anything. Its output cannot exceed 1.8 V, only 0.3 V above the cable’s 1.5 V maximum threshold, so the cable may not read it reliably, and the divider would hand a 1.8 V receiver about 3.3 V. That target needs a proper shifter or a 1.8 V adapter.

    What I do at the bench

    I never connect the cable’s red 5 V wire to a target. It gets insulated and parked. I haven’t verified the wire colours on my cable, so I read its pinout card.

    Before connecting anything I measure. With the target powered from its own supply and nothing else attached, I put a multimeter between its TX pad and ground, at idle, since a toggling line gives a misleading average. If I don’t see about 3.3 V I stop. That covers 1.8 V, 2.5 V, a floating reading, and anything well above 3.6 V. I use insulated probe tips and hold the board still, because a slipped probe shorting two fine pads is a real risk. Then I plug the cable into USB with nothing on its header and measure TXD against its ground wire. A listing that says 5 V may only describe the power wire.

    Wiring goes in this order, with the cable unplugged from USB and the target off: cable ground to target ground, target TX straight to cable RXD, then cable TXD through the 1 kΩ to the target’s RX with the 2 kΩ from that point to ground. Then I power the target from its own supply, never from the cable as well, and plug the cable in last. At idle the target’s RX pin should read about 3.3 V with an ideal 5 V cable. Under 2 V means something is loading the line, and anything above the target’s VDD + 0.3 V means I unplug at once. To disconnect I unplug USB first, power the target down, then remove the wires. The order matters because a cable plugged into a dead board puts about 3.3 V on its RX pin, and some of that can leak through the chip’s protection structures into a board that should be off.

    The last rule has no numbers. I never connect to a device that is plugged into mains. Smart plugs, bulbs and some routers use non-isolated supplies, where the board’s ground can sit at mains potential, and a serial cable then ties that to your PC. A USB isolator reduces the risk without making it safe. If I don’t know what powers a board, I don’t connect. If the target runs from a battery, I disconnect the battery before soldering, and I never short one or charge a swollen cell. I touch an earthed metal object before handling boards, hold them by the edges, and unplug before soldering or moving wires.

    Part 4 uses this adapter to find the console on my own router, with the logic analyzer to work out the baud rate.

    Other parts of the Hardware hacking series: 1, updating the firmware on a Pinecil V2; 2, the bench I work on; 3, using my 5 V FTDI cable on 3.3 V UARTs; 4, finding the UART console on a router I own (publishes Nov 10); 5, reading SPI flash without wrecking it (publishes Nov 11); 6, decoding I2C and SPI with sigrok (publishes Nov 12); 7, JTAG and SWD basics (publishes Nov 13).
  • Hardware hacking, part 2: the bench I work on and what each tool is for

    Hardware hacking, part 2: the bench I work on and what each tool is for

    Part 2 of 7 in the Hardware hacking series. Part 1: updating the firmware on a Pinecil V2.

    Nothing on my bench is expensive. I bought it one problem at a time, and that matters for this series. The point is not to show off lab gear, it is to show how little it takes to look inside a device, which is also how little an attacker needs. If a cheap logic analyzer and a serial cable can show what a router prints at boot, then “nobody will ever open it” is not a security control.

    The rules before the tools

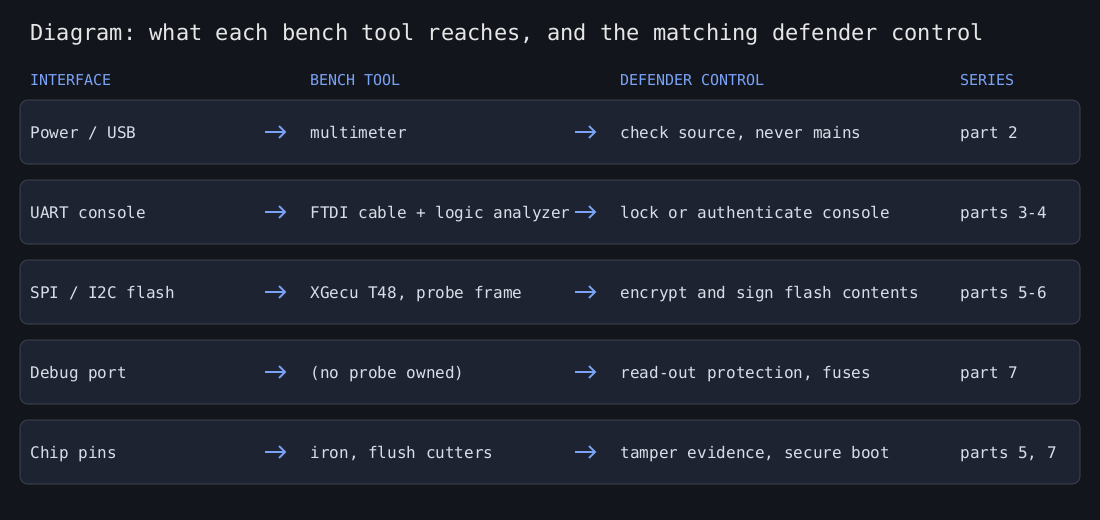
    Diagram: five device interfaces, the bench tool used to reach each, and the matching defender control

    The diagram above is one I drew to map each interface a device exposes to the bench tool that reaches it and the control that closes it.

    Everything here happens on hardware I own and am allowed to take apart. No work devices, no borrowed ones, nothing that belongs to a neighbour or a client.

    I do not open, probe or connect anything that is plugged into mains. Many small devices, such as smart plugs, bulbs and some power bricks, have supplies that are not isolated from mains, so a board’s ground can sit at mains potential. I work on boards powered from a proper low-voltage adapter, a battery or USB, and if I am unsure what powers a board, I do not connect anything.

    Then the boring habits. Power down and unplug before soldering, swapping a chip or moving a probe onto a chip. For UART and logic captures I make the connections with the target off and power it up afterwards, from its own supply only, never from the serial cable as well. Ground goes on first and comes off last. I touch an earthed metal object, such as an unpowered PC case, before handling a board, and I hold boards by the edges, because static discharge can damage chips without any visible sign. If you use a wrist strap, use one with a built-in series resistor and never wear it near anything that could be connected to mains. Wear safety glasses when cutting leads or soldering, and keep some ventilation going.

    The iron: Pinecil V2

    I covered the firmware in part 1. It is a small USB-C powered iron running IronOS, and I use it for tinning wires, pin headers and joint rework. A hot tip burns skin and scorches a desk, so it sits in its stand while it is on, and I let it cool before putting it away.

    The logic analyzer: HiLetgo 24 MHz, 8 channels

    This is a cheap Saleae-style clone that works with the open source sigrok and PulseView software through the fx2lafw driver. It records when each of up to eight digital lines goes high or low. It does not measure voltage and it does not replace a multimeter. It gives you timing.

    Two things matter in practice. The sample rate tops out at 24 MHz, but a UART at 115200 baud has bits about 8.68 microseconds long, so at 24 MHz you get roughly 208 samples per bit, far more than needed. The other is voltage. I have not found a datasheet for mine, so I treat its inputs as unprotected with a threshold I cannot adjust. I measure the target’s logic level with a multimeter first, with the target powered from its own supply and nothing else connected, I connect the analyzer’s ground before any signal lead, and I do not expect it to read a 1.8 V signal reliably.

    In part 6 I decode I2C and SPI with it. Here is PulseView with a capture loaded. This is a synthetic signal I generated with a Python script (8N1 at 115200 baud, written as a raw binary file and opened in PulseView), not a capture from a device.

    PulseView window with a synthetic 115200 baud UART signal on channel 0 and a millisecond time scale

    The image shows PulseView with a synthetic UART trace on channel 0 and a time scale in milliseconds along the top.

    The serial cable: FTDI FT232RL, 5 V

    A USB-to-serial cable with an FTDI chip and a 6-pin 0.1 inch female header. It lets a PC talk to the UART console that many routers and embedded boards expose on a few unpopulated pads. A UART needs a transmit line, a receive line and a ground. The line idles high, and each byte is framed by a low start bit and a high stop bit. There is no clock, so both sides have to agree on the baud rate in advance.

    Mine is sold as a 5 V cable, and I expect its data lines to be 5 V too, not only the red power wire. I will confirm that by measuring the idle level of its TX line with the USB end plugged in. Many boards run their UART at 3.3 V, and a 5 V transmit line into a 3.3 V receiver is the real risk, which leaving the red wire unconnected does not fix. I never connect the cable’s 5 V wire to a target, I connect only ground, TX and RX (cable TX to target RX, target TX to cable RX), and I measure the target’s logic level first. Part 3 makes this cable safe on 3.3 V targets, with the numbers worked out.

    The programmer: XGecu T48

    A universal programmer with a ZIF socket and a set of adapters (mine came with 19) for SPI and I2C EEPROM, NOR and NAND flash, microcontrollers and BIOS chips. Its software, Xgpro, is Windows only, so I won’t show screenshots of it here and I only download it from the vendor. Chips go in the socket after I have taken them off the board, which means desoldering, heat and a steady hand. Orientation and supply voltage have to be right before I start a read, because a chip in backwards or at the wrong voltage can be destroyed.

    The probe frame

    A small frame with four probe pens that holds against a board and touches the pads or pins of a chip without desoldering it. It is sold as a BDM frame, though it is just a probe holder and has nothing to do with Motorola’s debug interface. I use it when I can’t or won’t desolder something, and it is where most of my failed reads come from. The rest of the board is still attached to the chip, so other devices on the same bus can interfere. Back-powering can also damage the board or the programmer, so for in-circuit reads the board stays unpowered except for whatever the programmer supplies, at the voltage the chip expects. Part 5 covers reading in circuit, and why I read every chip twice and compare hashes before I trust a dump.

    The small stuff

    DOWELL micro flush cutters for trimming leads, always cutting away from my face because clipped leads fly. A pack of 120 Dupont jumper wires for temporary connections. A sheet of PTM7950 phase-change thermal pad for putting a device with a heatsink back together properly. A pad that has been removed gets replaced rather than reused, and old residue is cleaned off with isopropyl alcohol first.

    What is not on the bench

    No JTAG or SWD probe. Part 7 on debug ports is therefore about concepts, pinouts and how vendors lock those ports, not a walkthrough on my own hardware.

    Why a defender should care

    Every tool above is cheap and easy to buy, which is the whole argument. If your product ships with an open UART console, an unprotected SPI flash holding secrets in plain text, or a debug port that never got locked, assume someone with this bench will find it. The fixes are in the design: authenticate or close the console, encrypt and sign what is in flash, and fuse the debug port before shipping. The next parts show each one from the owner’s side of the soldering iron.

    Other parts of the Hardware hacking series: 1, updating the firmware on a Pinecil V2; 2, the bench I work on; 3, using my 5 V FTDI cable on 3.3 V UARTs; 4, finding the UART console on a router I own (publishes Nov 10); 5, reading SPI flash without wrecking it (publishes Nov 11); 6, decoding I2C and SPI with sigrok (publishes Nov 12); 7, JTAG and SWD basics (publishes Nov 13).
