Author: canutethegreat

  • Flipper Zero, part 1: what it actually is and what it can’t do

    Flipper Zero, part 1: what it actually is and what it can’t do

    Part 1 of 5 in the Flipper Zero series.

    I own a Flipper Zero, and the first thing that struck me was how ordinary the insides are. The internet has built it up into a skeleton key, and some people wave it off as a toy. Neither is right. If you are responsible for doors, badges or wireless gear, it helps to know which parts of the legend are true, because the bad habits it exposes are very old ones.

    This series covers it from the defender’s side, on hardware I own, and nothing here is a how-to for getting into other people’s property. Later parts cover access cards, Sub-GHz remotes, USB keystroke injection and the Wi-Fi dev board.

    A small computer with a lot of radios

    The Flipper Zero comes from Flipper Devices Inc. It was funded on Kickstarter in 2020, where it raised about $4.8 million, and the first units reached backers roughly 18 months later. The firmware runs on FreeRTOS and is open source under the GPL, and the schematics are published. An app store opened in July 2023.

    The brain is an STM32WB55RG: a 64 MHz Arm Cortex-M4 for the application and a separate 32 MHz Cortex-M0+ for the radio stack, sharing 1024 KB of flash and 256 KB of SRAM. The screen is a 1.4 inch monochrome LCD at 128×64, you drive it with a five-way D-pad, and a microSD card (not in the box) holds your data. The interface is a pixel-art dolphin whose mood depends on how you use the device. That was a deliberate choice, and it explains the toy-versus-weapon argument better than any spec does.

    The interfaces

    Each radio is a separate, fairly standard part:

    • Sub-1 GHz: a TI CC1101 transceiver covering 315, 433, 868 and 915 MHz depending on region. This is where garage doors, gates and simple sensors live.
    • NFC at 13.56 MHz: an ST25R3916 handling ISO 14443 A and B, so MIFARE Classic, Ultralight and DESFire, plus FeliCa, iClass (Picopass) and NFC Forum tags.
    • 125 kHz RFID for older proximity cards, with formats such as EM4100 and HID H10301.
    • Bluetooth LE 5.4, infrared transmit and receive, iButton contacts and 13 GPIO pins. Flipper’s tech specs list those as 3.3V logic with 5V tolerant inputs. I treat that as a limit rather than an invitation: if you wire anything to them, read the GPIO documentation first and never connect another device’s power rail to the header.
    • USB-C, over which it can present itself as a keyboard. That is the BadUSB feature.
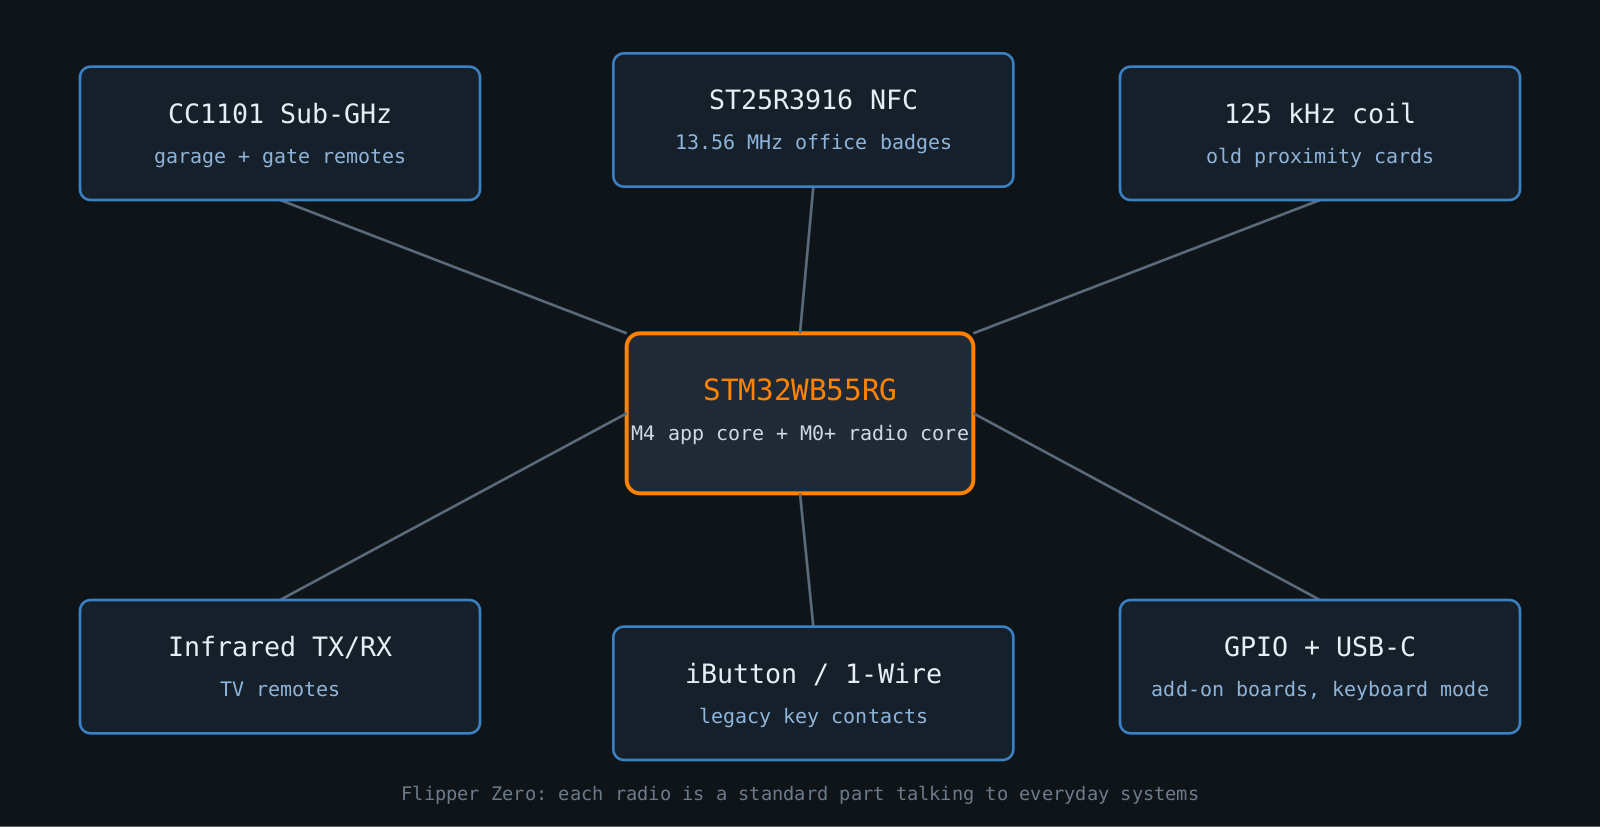
    Block diagram of the Flipper Zero: its microcontroller connected to the Sub-GHz, NFC, 125 kHz RFID, infrared, iButton, GPIO and USB interfaces

    Every item is a commodity part a hobbyist could buy as a separate module. What Flipper Devices did was put them in one pocketable case with a friendly interface.

    Myth versus reality

    “It cracks any card.” No. Reading a card is not the same as breaking it. A 125 kHz card announces a fixed ID to anyone who asks, so copying one is trivial, and that is a flaw in the card. A system using modern cards with proper cryptographic authentication is a different problem, and a handheld does not change that.

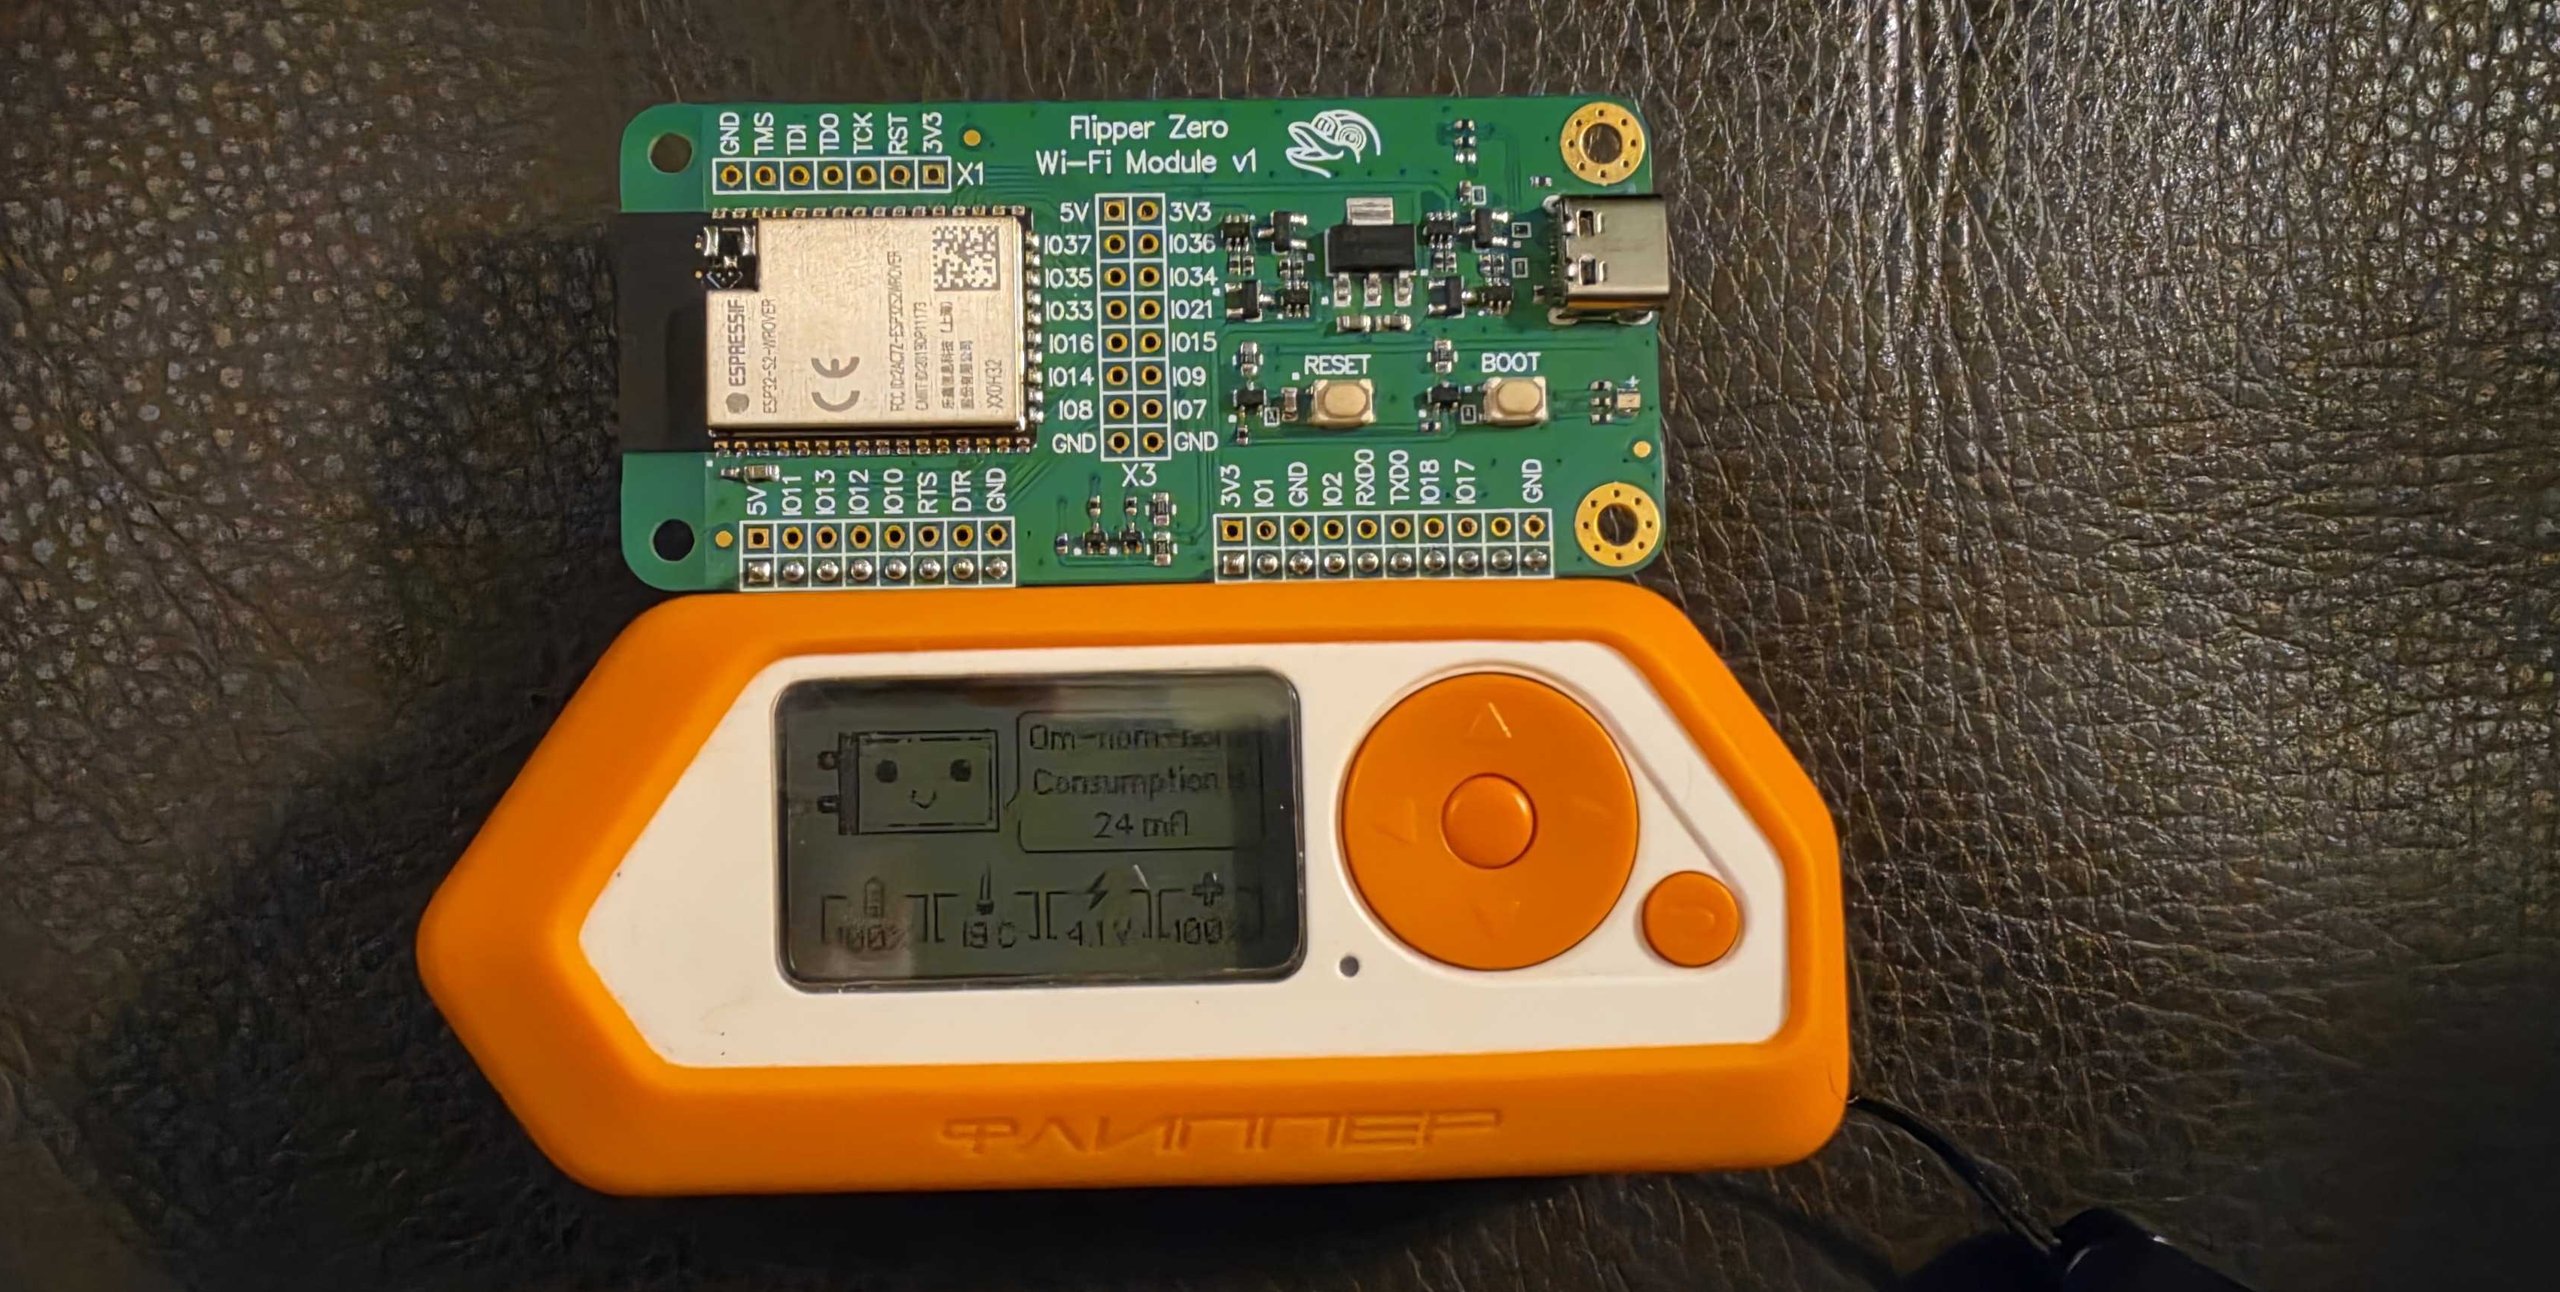
    “It does Wi-Fi attacks.” Not by itself. There is no Wi-Fi radio on the board. The Wi-Fi features come from a separate add-on board, which gets its own part.

    “It can open any car or garage.” It can record and replay Sub-GHz signals, which only works against a receiver that accepts the same code every time. Rolling codes are designed to stop exactly that, and I will go through how in part 3.

    “It’s a toy.” Also no, as the next section shows. The honest summary is that the Flipper makes known weaknesses easy to demonstrate. It does not invent new ones.

    Why institutions got nervous anyway

    Amazon banned its sale on 7 April 2023, describing it as a card skimming device. Packages ordered in Brazil in 2023 were reported seized by the telecom regulator Anatel. In February 2024, Innovation, Science and Economic Development Canada announced an intention to ban devices that could be used to clone wireless signals for remote entry, in response to a rise in car theft. Whether those moves were proportionate is a fair argument. What they show is that people are worried about a class of cheap, easy to use radio tools, and banning one product will not make the underlying weaknesses go away.

    There is a milder example too. With third-party firmware or apps the device can send Bluetooth LE advertisements that pop up on nearby phones. That was disruptive enough that Android and Windows added detection for BLE spam.

    What a defender should do with this

    Treat it as a cheap way to audit your own estate, within your local radio rules. If it can read and replay your badges or remotes, so can many other devices that do not have a dolphin on the screen. Check which card technology your access system uses, whether your gate remotes use fixed codes, and whether your endpoints let any USB keyboard type into a logged-in session. If the answer is a fixed identifier, a protocol with known weaknesses or a remote with no rolling code, the gadget is the least of your worries, so plan the migration.

    Only point it at gear you own or have written permission to test. That is the law in most places, and it is also what separates an audit from a problem.

    Part 2 looks at RFID and NFC badges, and why so many office cards are weaker than people think.

    Other parts of the Flipper Zero series: part 1, part 2, part 3, part 4, part 5.

  • Zombie infrastructure: forgotten assets and attack surface management

    Zombie infrastructure: forgotten assets and attack surface management

    Every organisation I’ve worked with had infrastructure nobody remembered. A staging environment from a project that got cancelled. A marketing microsite from a 2019 campaign, still running a CMS that hasn’t been patched since. A DNS record pointing at a cloud resource someone deleted two years ago. A test tenant with a service account whose password hasn’t changed since it was created.

    None of it shows up in the asset inventory, because if it did, someone would have turned it off. That’s what makes it dangerous. You can’t patch, monitor or decommission something you don’t know exists, and attackers are very good at finding exactly those things. It’s Halloween, so let’s talk about the undead.

    Why this keeps causing breaches

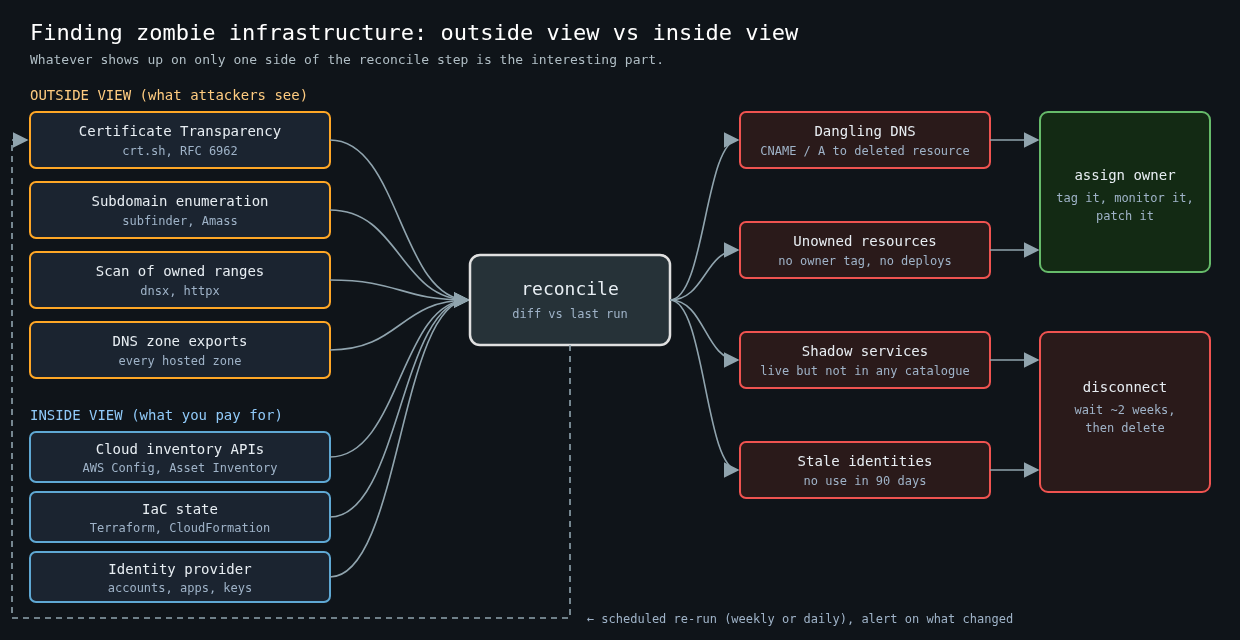
    Flow diagram: Certificate Transparency, subdomain enumeration, scans and DNS exports plus cloud inventory, IaC state and identity provider feed a reconcile step that outputs dangling DNS, unowned resources, shadow services and stale identities, each routed to assign an owner or disconnect then delete, on a scheduled loop

    Two incidents make the case better than any vendor slide.

    In the 2017 Equifax breach, attackers came in through CVE-2017-5638 in Apache Struts on an online dispute portal. The patch had been out since early March. Equifax had an internal alert about it and ran a scan, and the scan didn’t find the vulnerable system. Then, per the US House Oversight Committee’s report, an SSL certificate on a device that inspected outbound traffic had expired months earlier, so data left the network uninspected for weeks. The vulnerable app and the blind monitoring device were both things the organisation owned and had lost track of.

    In January 2024, Microsoft disclosed that the group it tracks as Midnight Blizzard had password-sprayed its way into a legacy, non-production test tenant account that didn’t have MFA. From there the attackers used a legacy test OAuth application with elevated access to reach corporate mailboxes, including senior leadership. The attack didn’t need anything clever. It needed one forgotten account in one forgotten tenant.

    The pattern is consistent. The production system everyone watches is usually fine. The breach starts in the thing that was supposed to be temporary.

    The common kinds of zombie

    Forgotten hosts and services are the obvious ones: old VMs, test environments, a jump box someone built for a migration. They’re unpatched because no patching process knows about them, and they often have weaker auth because they were “only for testing”.

    Dangling DNS is subtler and, in my experience, more common. A CNAME for promo.example.com points at example-promo.s3-website-us-east-1.amazonaws.com, or an Azure App Service hostname, or a Heroku app. The cloud resource gets deleted, but the DNS record stays. If the provider lets anyone claim that name, an attacker registers it and now serves content on your subdomain, with your cookies in scope if they’re set on the parent domain. The community-maintained “can-i-take-over-xyz” project on GitHub tracks which services are vulnerable to this and how to fingerprint them.

    Released IP addresses are the same problem one layer down. An A record still points at an Elastic IP or public IP you released. The cloud provider hands that IP to another customer, and your hostname now resolves to their server.

    Then there are identities: service accounts, API keys, OAuth apps and test tenants that outlived their project. These don’t show up in a port scan, which is why they get forgotten even by teams that do external scanning well.

    Find what you have from the outside first

    Start where an attacker starts, because that view is free of your assumptions.

    Certificate Transparency (RFC 6962) logs every publicly trusted TLS certificate, and every hostname you ever got a certificate for is in there. That’s usually the single best source of forgotten subdomains:

    curl -s 'https://crt.sh/?q=%25.example.com&output=json' \
      | jq -r '.[].name_value' | tr 'A-Z' 'a-z' | sed 's/^\*\.//' | sort -u > ct-hosts.txt

    Passive DNS and enumeration tools such as subfinder or OWASP Amass add hostnames from other sources. Then check which of them resolve and answer:

    subfinder -d example.com -silent | sort -u > enum-hosts.txt
    sort -u ct-hosts.txt enum-hosts.txt | dnsx -silent -a -cname -resp > resolved.txt
    cut -d' ' -f1 resolved.txt | sort -u | httpx -silent -status-code -title -tech-detect > live.txt

    Only run active probing against domains and IP ranges you own or are authorised to test. CT logs will happily list hostnames that belong to a vendor or a former subsidiary.

    For dangling DNS specifically, look at every CNAME pointing at a cloud provider’s namespace and check whether the target still exists. An NXDOMAIN on the target, or a provider’s “no such bucket” or “app not found” page, is the signal:

    dig +short CNAME promo.example.com
    # example-promo.s3-website-us-east-1.amazonaws.com.
    curl -s http://promo.example.com/ | grep -o 'NoSuchBucket'

    Then compare against what you think you have

    The outside view tells you what’s exposed. The inside view tells you what you’re paying for. Pull both and reconcile them.

    Every cloud provider has an inventory API. On AWS, the resource groups tagging API or AWS Config lists resources across services, and Route 53 can export every record you host. On GCP, Cloud Asset Inventory does the same with gcloud asset search-all-resources, and Azure has Resource Graph. Run them across every account and subscription, including the ones in the “sandbox” OU nobody looks at.

    The reconciliation is where the value is:

    • Hostnames in DNS or CT with no matching cloud resource are dangling records or something hosted elsewhere you didn’t know about.
    • Cloud resources with no owner tag and no recent deploys are zombie candidates.
    • Public IPs and load balancers that answer on the internet but aren’t in any service catalogue are shadow services.
    • Identities with no sign-in or API use in 90 days are accounts to disable.

    Give everything an owner, or a death date

    Discovery without ownership just produces a spreadsheet that’s wrong next month. The policy that works is simple to state and annoying to enforce: every asset has an owning team, and anything without one is scheduled for shutdown.

    Enforce it at creation time. Require an owner tag through AWS Service Control Policies or tag policies, Azure Policy or GCP organisation policy constraints, so untagged resources can’t be created in the first place. Give temporary environments an expires tag and a job that deletes them when it passes. Delete DNS records in the same change that deletes the resource they point to. Infrastructure as code helps a lot here, because removing a resource from Terraform can remove its DNS record in the same apply.

    For decommissioning, I like a two-step approach. First, disconnect the asset: remove it from DNS, block inbound traffic, disable the account. Wait a couple of weeks. If nobody screams, delete it. If someone does, you’ve just found the owner.

    Make it continuous

    A one-time sweep finds a pile of zombies and then the pile slowly grows back. Run the external discovery on a schedule, diff the results against the previous run, and alert on new hostnames, new open ports and new dangling CNAMEs. Commercial attack surface management products do this with more sources and nicer dashboards, but the core loop of discover, diff, assign an owner and decommission works fine with open-source tools and a cron job.

    The test is easy. Pick a random hostname from your CT log results and ask who owns it. If the answer takes more than a minute, you’ve got zombies.

  • Security headers that matter: CSP, HSTS and friends

    Security headers that matter: CSP, HSTS and friends

    Run any site through a header scanner and you’ll get a letter grade and a list of a dozen headers you’re “missing”. Some of them matter a lot. Some do almost nothing in 2026. One of them, if you follow old advice, can make things slightly worse. Chasing the grade is how teams end up with a Content-Security-Policy that allows 'unsafe-inline' from * and a perfect score.

    Here’s how I’d split them, roughly in the order I’d spend effort.

    HSTS: cheap, high value, one sharp edge

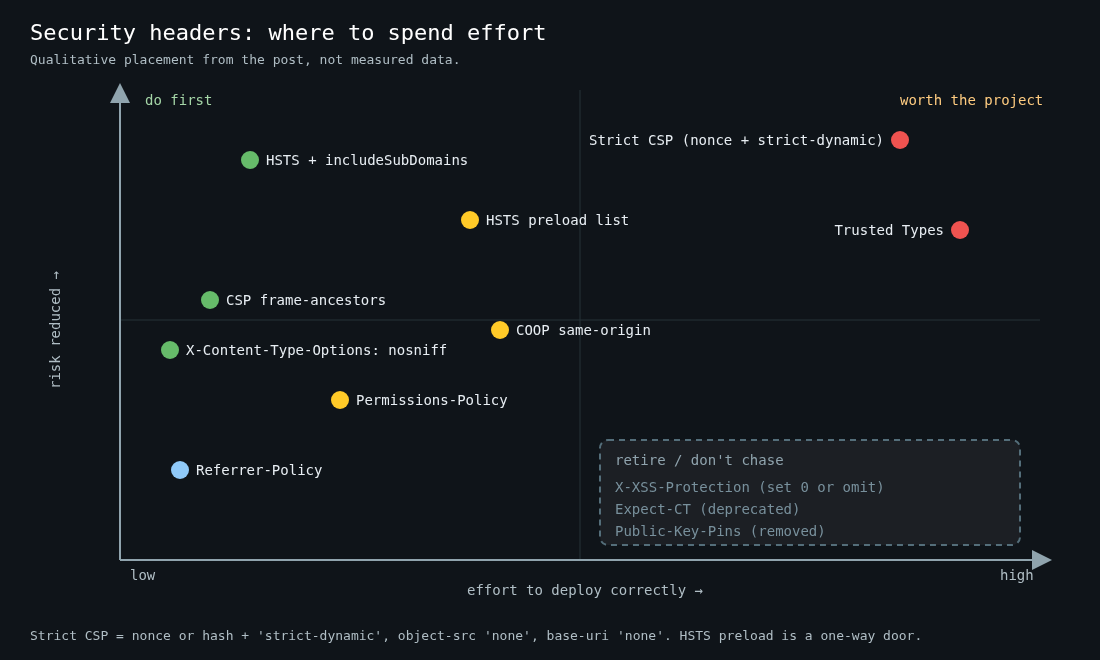
    Chart placing HTTP security headers by deployment effort and risk reduced: HSTS and nosniff low effort, strict CSP and Trusted Types high effort and high value, and X-XSS-Protection, Expect-CT and HPKP in a retire zone

    HTTP Strict Transport Security (RFC 6797) tells the browser to only talk to your host over HTTPS for a set period, and to refuse click-through on certificate errors. It closes the gap where a user types example.com, the first request goes out over plain HTTP, and someone on the coffee shop network rewrites the redirect. That’s the SSL stripping attack Moxie Marlinspike demonstrated back in 2009, and it still works against sites without HSTS.

    Strict-Transport-Security: max-age=63072000; includeSubDomains; preload

    The sharp edge is includeSubDomains. It applies to every subdomain, including that old internal tool on legacy.example.com that only speaks HTTP. Roll it out with a short max-age first (say 300 seconds), confirm nothing broke, then go to a year or two.

    The preload token only matters if you submit the domain to the browser preload list at hstspreload.org, which bakes it into Chrome, Firefox and Safari so even the very first visit is HTTPS. The list requires a max-age of at least a year, includeSubDomains and the preload token. Getting removed later takes months to reach users, so treat preload as a one-way door.

    CSP: the one worth real effort

    Content-Security-Policy is the only header on the list that meaningfully reduces the impact of cross-site scripting, which is still one of the most common web bugs. It’s also the one most often deployed in a form that does nothing.

    The traditional approach was an allowlist of script sources: script-src 'self' https://cdn.example.com https://www.google-analytics.com. Research from Google (Weichselbaum et al., “CSP Is Dead, Long Live CSP!”, ACM CCS 2016) looked at real-world policies and found that around 95% of them could be bypassed, mostly because allowlisted domains hosted JSONP endpoints or old libraries an attacker could abuse. If you allow a large CDN, you allow every script on that CDN.

    What works is a nonce-based strict policy (wrapped here for readability, it’s a single header line):

    Content-Security-Policy:
      script-src 'nonce-r4nd0mB4se64' 'strict-dynamic' https: 'unsafe-inline';
      object-src 'none';
      base-uri 'none';
      frame-ancestors 'self';
      report-to csp-endpoint

    The server generates a fresh random nonce per response and puts it on every legitimate script tag: <script nonce="r4nd0mB4se64">. Injected scripts don’t have the nonce, so they don’t run. 'strict-dynamic' lets scripts you trusted load further scripts, which is what makes this workable with modern bundlers and tag managers. The https: and 'unsafe-inline' entries look alarming, but they’re fallbacks for old browsers: any browser that understands nonces ignores 'unsafe-inline', and any browser that understands 'strict-dynamic' ignores host and scheme sources.

    object-src 'none' kills plugin-based injection. base-uri 'none' stops an attacker injecting a <base> tag that silently re-points every relative script URL.

    The hard part is the nonce. It has to be unpredictable and unique per response, which doesn’t play well with fully cached HTML. For static sites, hash-based CSP ('sha256-...' per inline script) is the alternative.

    Roll it out with Content-Security-Policy-Report-Only first and collect reports for a few weeks. Expect noise from browser extensions injecting scripts. Filter on the source-file and blocked-uri fields before you panic.

    If you want to go further, Trusted Types (require-trusted-types-for 'script') makes DOM XSS sinks like innerHTML refuse plain strings. Support started in Chromium-based browsers, so check where the other engines are before relying on it. It takes real refactoring, so I’d do it for high-value apps, not everywhere.

    frame-ancestors, not X-Frame-Options

    Clickjacking defence is easy. frame-ancestors 'none' (or 'self') in CSP says who’s allowed to frame your page. X-Frame-Options: DENY is the older equivalent and only supports DENY or SAMEORIGIN. Send both if you need to support very old browsers; modern ones use frame-ancestors when both are present.

    The small ones that are still worth one line

    X-Content-Type-Options: nosniff
    Referrer-Policy: strict-origin-when-cross-origin
    Permissions-Policy: camera=(), microphone=(), geolocation=(), payment=()
    Cross-Origin-Opener-Policy: same-origin

    nosniff stops browsers from guessing a response’s type, which matters when users can upload files you later serve. Without it, a “text file” containing HTML or script could be treated as such.

    Referrer-Policy: strict-origin-when-cross-origin is already the default in current browsers. Set it explicitly anyway, especially if your URLs ever carry tokens or IDs. I’ve seen password reset tokens leak to third-party analytics through the Referer header more than once.

    Permissions-Policy turns off powerful browser features your site doesn’t use, including for any iframes you embed. It’s cheap and it limits what a compromised third-party script can ask for.

    Cross-Origin-Opener-Policy: same-origin puts your page in its own browsing context group, so a cross-origin window that opened you (or that you opened) can’t keep a handle to you. That blocks a family of cross-site leak attacks and is a prerequisite for cross-origin isolation. It can break OAuth and payment popups that rely on window.opener, so test those flows. same-origin-allow-popups is the usual compromise.

    The ones to stop worrying about

    X-XSS-Protection controlled a browser XSS filter that Chrome removed in 2019 and that no current major browser ships. The filter itself could be abused to leak information or selectively disable legitimate scripts. If you set it at all, set it to 0. Don’t set 1; mode=block because a scanner asked for it.

    Expect-CT is obsolete. Certificate Transparency is enforced by browsers regardless, and the header is deprecated.

    Public-Key-Pins (HPKP) is gone, and it was a footgun while it existed. Pin a key, lose the key, and your site is unreachable for returning visitors until the pin expires.

    Setting them without surprises

    Set headers in one place, at the edge or reverse proxy, so every response gets them. In nginx, two details catch people:

    server {
        add_header Strict-Transport-Security "max-age=63072000; includeSubDomains" always;
        add_header X-Content-Type-Options "nosniff" always;
        add_header Referrer-Policy "strict-origin-when-cross-origin" always;
    
        location /api/ {
            # Any add_header here means NONE of the server-level ones are inherited.
            add_header Cache-Control "no-store" always;
            include /etc/nginx/snippets/security-headers.conf;
        }
    }

    Without always, nginx only adds the header to 2xx and 3xx responses, so your error pages ship without them. And add_header directives are inherited from the enclosing level only if the current level has none of its own. Add one header in a location block and you silently drop all the others there. Put the common set in a snippet and include it everywhere.

    Then test what’s actually returned, from outside, on a few representative URLs including an error page:

    curl -sI https://example.com/does-not-exist | grep -iE 'strict-transport|content-security|x-content-type|referrer|permissions'

    Headers are a defence-in-depth layer. A strict CSP won’t fix the XSS bug, but it often turns an exploitable one into a blocked one and a report in your inbox. That’s a good trade for a few lines of config and a nonce.