Author: canutethegreat

  • Container image hardening: minimal images, non-root, read-only filesystems

    Container image hardening: minimal images, non-root, read-only filesystems

    Most container images in production are a full Linux distribution wearing a trench coat. A Debian or Ubuntu base, a package manager, a shell, curl, and an application running as root with a writable filesystem. It works, it’s easy to debug, and it hands an attacker who gets code execution everything they need for the next step.

    Hardening an image isn’t one big change. It’s a handful of small ones that each remove a capability the application never needed, and that an attacker would very much like to have. None of them are new, and every one of them gets skipped all the time.

    Start with less: minimal and distroless bases
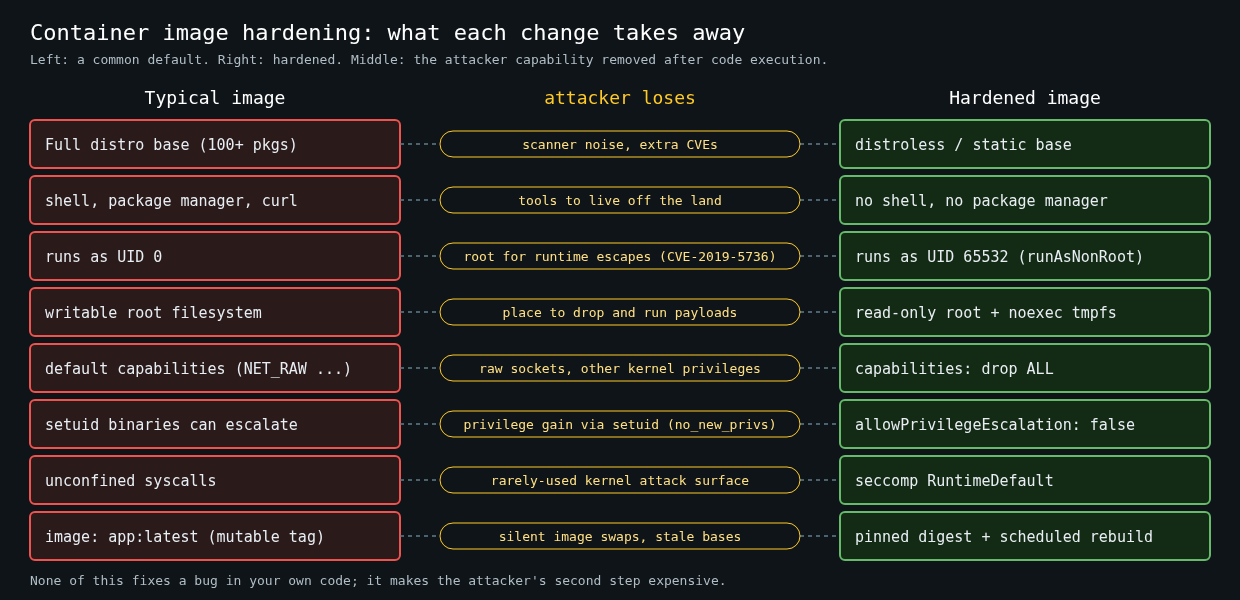
    Side-by-side comparison of a typical container image and a hardened one: distroless base, no shell, non-root UID 65532, read-only root with noexec tmpfs, all capabilities dropped, no privilege escalation, seccomp RuntimeDefault and pinned digests, with the attacker capability each change removes

    The fastest win is shipping fewer things. A typical debian or ubuntu base pulls in a hundred-odd packages, and your scanner will report CVEs against all of them, whether or not your app ever touches them. That noise has a real cost, which I covered in the vulnerability management series earlier this week. Every finding in a package you don’t use is triage time you’re not spending on one that matters.

    There are a few levels of minimal:

    • scratch is empty. Good for fully static binaries, like Go built with CGO_ENABLED=0. You have to bring your own CA certificates and timezone data if you need them.
    • Google’s distroless images contain the runtime pieces an app needs (libc, CA certs, tzdata, sometimes a language runtime) and no shell or package manager.
    • Wolfi-based images from Chainguard and minimal Alpine images sit somewhere in between, with a package manager available at build time.

    For a Go service, a multi-stage build onto distroless looks like this:

    FROM golang:1.25 AS build
    WORKDIR /src
    COPY go.mod go.sum ./
    RUN go mod download
    COPY . .
    RUN CGO_ENABLED=0 go build -trimpath -ldflags="-s -w" -o /out/app ./cmd/app
    
    FROM gcr.io/distroless/static-debian12:nonroot
    COPY --from=build /out/app /app
    USER 65532:65532
    ENTRYPOINT ["/app"]

    The compiler, the source and the module cache stay in the build stage. The final image is your binary plus a few megabytes of support files.

    The objection I always hear is debugging. “How do I exec into it without a shell?” On Kubernetes you don’t need to: an ephemeral debug container shares the target’s process namespace and brings its own tools.

    kubectl debug -it pod/payments-api-7d9f8c --image=busybox:1.36 --target=app

    That’s better than a shell baked into every image anyway, because the tools only exist while someone is actually debugging.

    Don’t run as root

    Containers running as UID 0 are the default, and it’s a bad default. Root inside a container isn’t the same as root on the host, since namespaces and dropped capabilities limit it, but it’s much closer than people assume, and it turns every container runtime bug into a bigger problem.

    CVE-2019-5736 is the classic example. A malicious process in a container could overwrite the host’s runc binary and get root on the host the next time runc ran. The exploit needed root inside the container. A container running as an unprivileged user wasn’t exploitable that way.

    Set the user in the image, with a numeric UID so Kubernetes can verify it:

    USER 65532:65532

    Then enforce it at the platform level so an image that forgets doesn’t get scheduled. In Kubernetes that’s runAsNonRoot: true in the security context, which makes the kubelet refuse to start a container whose user resolves to 0.

    If the app needs to bind to port 80 or 443, don’t give it root. Bind to 8080 and let the Service or the load balancer map the port, or add only NET_BIND_SERVICE.

    Make the root filesystem read-only

    An attacker with code execution usually wants to write something: a downloaded tool, a modified config, a web shell, a cron entry. A read-only root filesystem takes that away, and it catches a surprising number of bugs where an app was quietly writing logs or caches into its own image.

    Most apps need somewhere to write, usually /tmp or a cache directory. Give them exactly that as a tmpfs or an emptyDir volume and nothing else. With plain Docker:

    docker run --read-only \
      --tmpfs /tmp:rw,noexec,nosuid,size=64m \
      --cap-drop=ALL \
      --security-opt=no-new-privileges:true \
      --user 65532:65532 \
      registry.example.com/payments-api@sha256:<digest>

    The noexec on the tmpfs matters. A writable directory that can also execute binaries is half of what an attacker needed from a writable root.

    The Kubernetes security context

    All of this comes together in the pod spec. This is the block I start every deployment from:

    securityContext:
      runAsNonRoot: true
      runAsUser: 65532
      runAsGroup: 65532
      seccompProfile:
        type: RuntimeDefault
    containers:
      - name: app
        image: registry.example.com/payments-api@sha256:<digest>
        securityContext:
          allowPrivilegeEscalation: false
          readOnlyRootFilesystem: true
          capabilities:
            drop: ["ALL"]
        volumeMounts:
          - name: tmp
            mountPath: /tmp
    volumes:
      - name: tmp
        emptyDir:
          medium: Memory
          sizeLimit: 64Mi

    allowPrivilegeEscalation: false sets the kernel’s no_new_privs flag, so setuid binaries can’t raise privileges. Dropping all capabilities removes things like CAP_NET_RAW, which some runtimes still grant by default and which lets a process craft raw packets. RuntimeDefault seccomp blocks a set of syscalls that normal apps never make.

    Kubernetes Pod Security Admission’s restricted profile enforces most of this for you: non-root, no privilege escalation, all capabilities dropped and a seccomp profile. It doesn’t require a read-only root filesystem, so that one you have to enforce with your own policy (Kyverno, Gatekeeper or a ValidatingAdmissionPolicy). Turn restricted on in warn mode for a namespace first, see what breaks, and fix those workloads before switching to enforce.

    Pin what you ship, rebuild what you pin

    Reference images by digest in deployment manifests, not by tag. A tag is a mutable pointer, and :1.42.0 can be repushed. The digest is a hash of the content and can’t.

    Pinning has a cost, though. A pinned base image never gets its security fixes unless you rebuild. Pair digest pinning with an automated job that rebuilds images on a schedule against fresh bases and opens the PR to bump the digest. Pinning without rebuilding is how you end up running a two-year-old OpenSSL with perfect reproducibility.

    What this doesn’t fix

    None of this stops an exploit in your own code. A read-only, non-root, distroless container with a SQL injection bug still has a SQL injection bug, and the attacker still reaches whatever the app’s database credentials can reach. Container runtime escapes still happen too. CVE-2024-21626, the runc file descriptor leak fixed in runc 1.1.12, allowed escape through a crafted working directory, and the fix was patching runc, not anything in the image.

    What hardening does is make the second step expensive. The attacker lands with no shell, no package manager, no writable path that can execute, no root and no extra capabilities. I’ve read enough incident reports to know that “the attacker had a foothold but couldn’t do much with it” is one of the better sentences you can have in one.

  • Patch SLAs that teams actually meet

    Patch SLAs that teams actually meet

    Part 3 of 3 in the Vulnerability management that works series. Part 1: Prioritising vulnerabilities: CVSS vs EPSS vs CISA KEV. Part 2: SBOMs: what they’re actually good for.

    Most patch SLAs I’ve reviewed were written once, by a security team, copied from a compliance framework, and then missed every month for years. Everyone knows they’re missed. The dashboard is red, the quarterly report says “remediation velocity is improving”, and the actual exposure doesn’t change much. An SLA that’s always missed isn’t a control. It’s a number people have stopped reading.

    The first two parts of this series covered deciding what matters and knowing where it runs. This one is about the commitment itself: how to write an SLA that engineering teams can actually hit, and how to measure it so the number tells you something.

    Why SLAs get missed

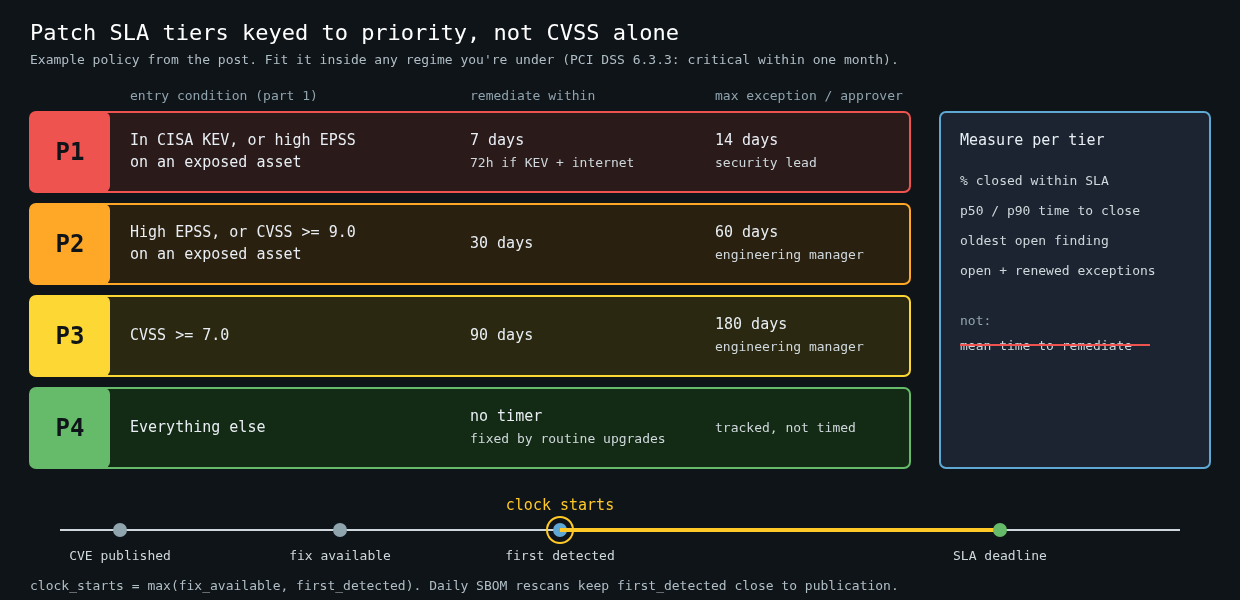
    Table of patch SLA tiers: P1 7 days (72 hours for KEV on internet-facing assets), P2 30 days, P3 90 days, P4 untimed, with exception limits, per-tier metrics and a timeline showing the clock starting at the later of fix availability and first detection

    In my experience it’s rarely laziness. The usual causes are structural.

    The SLA is keyed to CVSS. “Criticals in 15 days, highs in 30” sounds reasonable until you see that a big share of your findings are high or critical, most of them in packages nobody can exploit. Teams triage by ignoring, and the ones that matter get lost in the pile.

    The clock starts at the wrong time. If the timer starts when the CVE is published, but your scanner only picks it up eleven days later, a team with a 15-day SLA has four days left before they’ve even heard about it.

    The fix isn’t in the team’s hands. A vulnerable OpenSSL in a base image maintained by a platform team, or a library pinned by a vendor’s SDK, can’t be fixed by the team that gets the ticket. They miss the SLA and learn that the SLA is noise.

    There’s no legitimate way to say no. Without an exception process, a team facing a fix that would break a major integration has two options: silently miss, or mark the finding as a false positive. Both destroy the data.

    Tie tiers to priority, not severity

    Use the priority tiers from part one as the SLA tiers. Something like this, written as policy in a file that lives in a repo and gets reviewed like code:

    # vuln-sla.yaml
    tiers:
      P1:   # in CISA KEV, or high EPSS on an exposed asset
        remediate_within: 7d
        emergency_if: [kev, internet_facing]
        emergency_within: 72h
        max_exception: 14d
        exception_approver: security-lead
      P2:   # high EPSS, or CVSS >= 9.0 on an exposed asset
        remediate_within: 30d
        max_exception: 60d
        exception_approver: engineering-manager
      P3:   # CVSS >= 7.0
        remediate_within: 90d
        max_exception: 180d
        exception_approver: engineering-manager
      P4:
        remediate_within: null   # fixed by routine upgrades, tracked not timed
    clock_starts: max(fix_available, first_detected)

    These numbers aren’t arbitrary, though they aren’t magic either. PCI DSS v4.0 requirement 6.3.3 asks for critical patches to be installed within one month of release. FedRAMP’s continuous monitoring expects high-risk findings fixed within 30 days, moderate within 90 and low within 180. If you’re under one of those regimes, your tiers have to fit inside them. If you’re not, they’re still a sane reference point.

    P1 is deliberately short. The 72-hour emergency path exists because the gap between a fix being available and mass exploitation can be very short for internet-facing products. Equifax is the case everyone cites for a reason: the Apache Struts fix for CVE-2017-5638 was out in early March 2017, and attackers were in through an unpatched dispute portal by mid-May. That’s about two months, and the exploit was public within days of the advisory.

    Start the clock fairly

    Starting the clock at max(fix_available, first_detected) sounds generous. It’s actually the version that makes detection your problem, which is where it belongs. If your SBOM store gets rescanned daily (part two), first detection is within a day of the advisory for anything you’ve inventoried, and the gap stops mattering. If it isn’t, the SLA report shows a lot of findings detected weeks after publication, and that’s a scanning problem you can fix.

    Starting at fix availability matters too. Holding a team to a 7-day SLA for a vulnerability with no patch measures nothing. For no-fix cases, the P1 action is a mitigation, such as a WAF rule, disabling the feature or pulling the service off the internet, and the SLA applies to the mitigation.

    Route the ticket to whoever can fix it

    The single most effective change I’ve seen is sending findings to the team that controls the fix instead of the team that owns the running service. A vulnerable package in a shared base image becomes one ticket for the platform team, not forty tickets for forty application teams who all have to wait on the same rebuild.

    That requires the asset inventory to know two owners per artifact: who runs it and who builds each layer. It’s worth the effort. Duplicate tickets for an unfixable root cause are the fastest way to teach people that the SLA isn’t real.

    Make the cheap path the default

    Teams meet SLAs when patching is boring. Concretely:

    • Rebuild container images on a schedule, not only when the app changes. A nightly rebuild against the latest base image clears most OS-package findings without anyone opening a ticket.
    • Let Renovate or Dependabot open dependency PRs continuously, and auto-merge patch-level updates when tests pass. The SLA work then becomes reviewing a PR that already exists.
    • Run unattended security updates on long-lived hosts, with a reboot window, so kernel and library fixes don’t wait for a human.
    • Keep a test suite good enough that people trust an automated upgrade. This is the hidden dependency of everything above.

    If a P3 finding requires a human to notice it, research it, write the fix and deploy it, a 90-day SLA will be missed in any organisation with more findings than engineers.

    Measure the distribution, not the average

    Mean time to remediate is the metric everyone reports and it’s nearly useless. A few ancient findings drag it up, a flood of auto-merged fixes drags it down, and it moves for reasons unrelated to risk. Report three things per tier instead: the percentage closed within SLA, the median and 90th percentile time to close, and the age of the oldest open finding.

    SELECT priority,
           round(100.0 * count(*) FILTER (WHERE closed_at - clock_start <= sla) / count(*), 1) AS pct_within_sla,
           percentile_cont(0.5) WITHIN GROUP (ORDER BY closed_at - clock_start) AS p50,
           percentile_cont(0.9) WITHIN GROUP (ORDER BY closed_at - clock_start) AS p90
    FROM findings
    WHERE closed_at >= now() - interval '90 days'
    GROUP BY priority
    ORDER BY priority;

    That query only sees closed findings, which flatters you. Pair it with the oldest open finding per tier, because a P1 that has been open for 40 days is the one an incident report will be about.

    Exceptions get reported too: how many are open, how many were renewed, and which teams hold most of them. An exception renewed three times isn’t an exception. It’s an accepted risk that someone senior should sign by name.

    The test of a good SLA

    An SLA is working when the percentage within SLA is high enough that a miss is surprising, and when a miss leads to a conversation about why. If your P1 compliance is 95% and every miss gets a short write-up, people will treat P1 seriously. If it’s 40%, nobody will, no matter what the policy document says.

    So start with tiers you can meet today, even if they feel loose, and tighten them as automation catches up. A 30-day P2 that’s met 95% of the time beats a 15-day P2 that’s met half the time, both for actual risk and for whether anyone believes the number.

  • SBOMs: what they’re actually good for

    SBOMs: what they’re actually good for

    Part 2 of 3 in the Vulnerability management that works series. Part 1: Prioritising vulnerabilities: CVSS vs EPSS vs CISA KEV.

    Software bills of materials had a hype cycle. Executive Order 14028 in May 2021 told US federal suppliers to provide them, vendors rushed out SBOM features, and for a couple of years every security conference had a talk about them. A lot of organisations now generate SBOMs because a contract or a customer questionnaire asked for one, file them somewhere, and never look at them again.

    That’s a shame, because there’s one job SBOMs do very well, and it’s the job that hurt most during Log4Shell. When a new vulnerability lands, they tell you where you’re running the affected component, in minutes instead of days.

    What an SBOM is, concretely

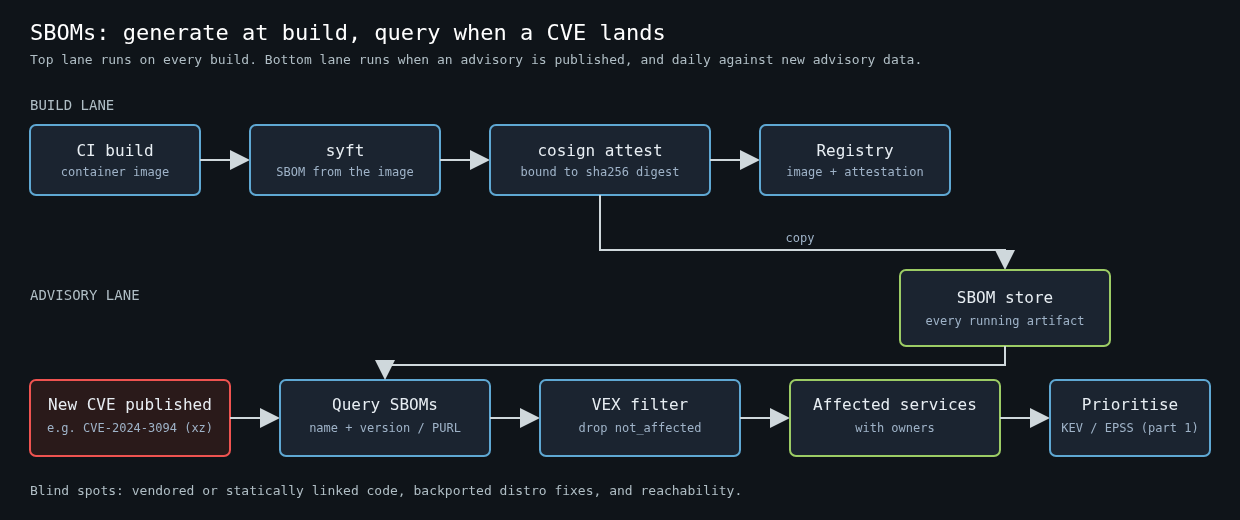
    Pipeline diagram: CI build, syft SBOM, cosign attestation and registry, with SBOM copies in a store that is queried when a new CVE is published, filtered through VEX, producing affected services for prioritisation

    An SBOM is a machine-readable inventory of the components inside a piece of software: package names, versions, identifiers, and ideally the relationships between them. There are two formats that matter. SPDX came out of the Linux Foundation and is published as ISO/IEC 5962:2021. CycloneDX came out of OWASP and has since been standardised by Ecma as ECMA-424. Both are fine. Pick the one your tooling handles best and stop debating it.

    The NTIA’s 2021 minimum elements document lists the fields an SBOM should carry: supplier, component name, version, other unique identifiers, dependency relationships, the author of the SBOM data, and a timestamp. In practice the identifier that does the heavy lifting is the package URL, or PURL, something like pkg:maven/org.apache.logging.log4j/[email protected] or pkg:deb/debian/[email protected]. PURLs are what let a scanner match a component against an advisory database without guessing from file names.

    Generate them at build time, from the artifact

    Where you generate the SBOM matters more than which format you use. An SBOM written from a lockfile describes what you meant to ship. An SBOM generated from the built container image describes what you actually shipped, including the OS packages in the base image that no lockfile in your repo mentions.

    Syft is the tool I reach for. Generating a CycloneDX SBOM for an image in CI is one line:

    syft registry.example.com/payments-api:1.42.0 -o cyclonedx-json=payments-api.cdx.json

    Then attach it to the image, so the inventory travels with the artifact instead of living in a CI log nobody can find:

    cosign attest --yes \
      --predicate payments-api.cdx.json \
      --type cyclonedx \
      registry.example.com/payments-api@sha256:<digest>

    Attest against the digest, not the tag. Tags move. An SBOM attached to :latest is a statement about an image that may no longer exist.

    Also push a copy into something you can query across the fleet. That can be a dedicated platform like OWASP Dependency-Track, or honestly a bucket of JSON files plus an index. The format is less important than being able to ask one question across every artifact you run.

    The question SBOMs answer

    That question is: “which of our running things contain component X at version Y?”

    On 29 March 2024, Andres Freund disclosed the backdoor in xz-utils, CVE-2024-3094, affecting versions 5.6.0 and 5.6.1. If you had SBOMs for every deployed image, the first hour looked like this:

    for f in sboms/*.cdx.json; do
      jq -r --arg f "$f" '.components[]
        | select(.name == "xz-utils" or .name == "liblzma5" or .name == "xz-libs")
        | select(.version | test("^5\\.6\\.[01]"))
        | "\($f)  \(.name)  \(.version)"' "$f"
    done

    If you didn’t, the first hour was a Slack thread asking every team to check their base images, followed by a day of partial answers. I’ve been on both sides of that, and the difference isn’t subtle. During Log4Shell I watched teams spend most of a week just establishing which services bundled log4j-core, because it was often a transitive dependency several levels down, or shaded inside another jar.

    The same SBOM store also feeds continuous matching. Instead of rescanning every image when the vulnerability database updates, you rescan the SBOMs:

    grype sbom:payments-api.cdx.json --fail-on high

    That’s fast, cheap, and it works for images that are already deployed and won’t be rebuilt this week.

    Where SBOMs are blind

    SBOMs are only as complete as the tool that generated them, and every generator has gaps.

    Statically linked and vendored code is the big one. If a C library was copied into your source tree or compiled into a binary, there’s no package manager metadata for a scanner to find. Go is better than most here because the toolchain embeds module information in the binary, which go version -m will print and Syft will read. Rust binaries carry nothing by default unless you build with cargo auditable. Copied-in JavaScript files, a single vendored .c file, or a library someone downloaded and checked in years ago will mostly be invisible.

    Version strings can lie too. Distributions backport security fixes without changing the upstream version, so a Debian package might report a version that looks vulnerable while carrying the patch. Good scanners read the distro’s security tracker data for this. Bad ones generate a stream of false positives that teach engineers to ignore the scanner.

    And an SBOM says nothing about reachability. A vulnerable component that’s present isn’t necessarily loaded, and a loaded library isn’t necessarily being called with attacker-controlled input.

    VEX is what makes SBOMs bearable

    That last gap is where VEX comes in, the Vulnerability Exploitability eXchange. A VEX document is a statement about a specific vulnerability in a specific product, with a status: not_affected, affected, fixed or under_investigation. A not_affected claim has to carry a justification, such as vulnerable_code_not_present or vulnerable_code_not_in_execute_path.

    OpenVEX, CSAF and CycloneDX can all carry VEX statements, and Grype accepts OpenVEX documents to suppress findings you’ve already analysed:

    grype sbom:payments-api.cdx.json --vex payments-api.openvex.json

    The value here is organisational, not technical. Someone investigates a finding once, writes down why it doesn’t apply, and that decision follows the artifact. Without it, the same finding gets triaged by three different people in three different quarters, and the one who’s in a hurry marks it as a false positive with no reason recorded.

    What I’d actually do

    Generate SBOMs from built images in CI, attest them to the digest, and copy them into a queryable store. Rescan the stored SBOMs daily against current advisory data and feed the results into the prioritisation from part one, so a KEV entry on an exposed service jumps to the front. Record triage decisions as VEX next to the SBOM.

    Skip the parts that don’t pay. I wouldn’t spend time on SBOM quality scores, on publishing SBOMs to customers who haven’t asked, or on generating them for every intermediate build. The SBOM that matters is the one for the thing running in production right now.

    Part three covers the last mile: setting patch SLAs that teams can actually meet once you know what to patch and where.

    Other parts: Part 1: Prioritising vulnerabilities: CVSS vs EPSS vs CISA KEV, Part 3: Patch SLAs that teams actually meet.