Category: Security

  • Hardware security modules, and why private keys shouldn’t live in application memory

    Hardware security modules, and why private keys shouldn’t live in application memory

    Most private keys in production live in a file. The application reads the PEM at startup, parses it, and keeps it in heap memory for as long as the process runs. Anything that can read that process’s memory, or the file, or a core dump, or a backup of the disk, can walk away with the key. And a stolen private key isn’t like a stolen password you can reset quietly. It’s the ability to be you, cryptographically, until every relying party stops trusting it.

    A hardware security module flips the model. The key is generated inside a tamper-resistant device, it’s marked non-exportable, and the application never holds it. The app sends data in and gets a signature or a decrypted value back. I think that one design change is worth more than most of the controls we stack around key files, and it’s a lot cheaper to adopt than it used to be.

    Keys have leaked from memory, repeatedly
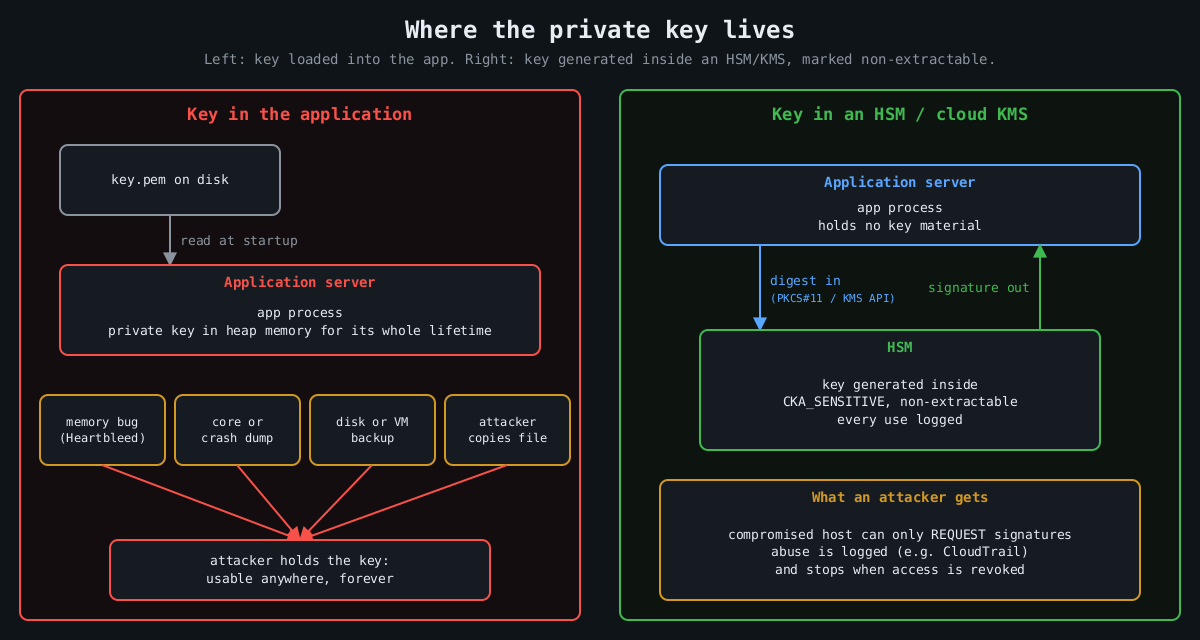
    Comparison: a key loaded into application memory leaks through memory bugs, dumps, backups and file theft, while a key inside an HSM never leaves it and a compromised host can only request logged signatures

    The canonical case is Heartbleed (CVE-2014-0160). A missing bounds check in OpenSSL’s TLS heartbeat extension, present in 1.0.1 through 1.0.1f, let a remote client read up to 64 KB of server memory per request. Whether a server’s private key could be extracted that way was debated for about a day. Then Cloudflare put up a challenge server, and several people independently recovered its private key from heartbeat responses. Every affected site then had to revoke and reissue certificates, because nobody could prove their key hadn’t been read.

    The Storm-0558 intrusion disclosed in 2023 is a more recent and more uncomfortable example. An attacker got hold of a Microsoft consumer account signing key and used it to forge authentication tokens that were accepted for Exchange Online mailboxes at roughly two dozen organizations, including US government agencies. Microsoft’s first explanation was that the key had ended up in a crash dump that later moved from an isolated environment into a debugging environment. It later said it had not found that crash dump. The US Cyber Safety Review Board’s report was blunt about the broader failures either way. Whatever the exact path, the key existed somewhere it could be copied.

    Code signing has the same history. Stuxnet’s drivers were signed with certificates stolen from Realtek and JMicron, which let them load on Windows without warnings. Signing keys are about the most valuable thing a software vendor owns, and a lot of them still sit on a build server’s disk.

    What an HSM actually guarantees

    An HSM is a dedicated device (a PCIe card, a network appliance, a USB token, or a cloud service backed by such hardware) that generates and stores keys and performs operations with them internally. Applications talk to it over a standard interface, usually PKCS#11, or through a cloud API. The security properties come from a few hardware and firmware decisions:

    Key attribute          Effect
    CKA_SENSITIVE=true     key value can never be read out in plaintext
    CKA_EXTRACTABLE=false  key can't be wrapped and exported at all
    CKA_SIGN=true          key may be used for signing, nothing else

    Validated devices are certified against FIPS 140-2 or its successor FIPS 140-3, and at the higher levels the device is built to detect physical tampering and wipe itself. For most of us the physical tamper resistance matters less than the logical boundary. Code execution on your app server, a memory disclosure bug, a leaked backup: none of them yield the key, because the key was never there.

    You can try the programming model on a laptop with SoftHSM, a software implementation of the PKCS#11 interface intended for testing:

    softhsm2-util --init-token --free --label app-signing
    pkcs11-tool --module /usr/lib/softhsm/libsofthsm2.so --login \
      --keypairgen --key-type EC:prime256v1 --label release-key
    pkcs11-tool --module /usr/lib/softhsm/libsofthsm2.so --login \
      --sign --mechanism ECDSA-SHA256 --label release-key \
      --input-file release.tar.gz --output-file release.sig

    SoftHSM obviously isn’t a security boundary, since its keys live in files. It’s useful because the same code then works against a real HSM by swapping the module path.

    Cloud KMS is the HSM most teams will actually use

    Most cloud providers sell this as a managed service: AWS KMS and CloudHSM, Google Cloud KMS with its HSM protection level, Azure Key Vault and Managed HSM. The managed KMS services are backed by FIPS-validated HSMs, charge per key and per request, and integrate with IAM. Signing a release artifact without ever touching a key looks like this:

    openssl dgst -sha256 -binary release.tar.gz > release.sha256
    aws kms sign --key-id alias/release-signing \
      --message fileb://release.sha256 --message-type DIGEST \
      --signing-algorithm ECDSA_SHA_256 \
      --query Signature --output text | base64 -d > release.sig

    For bulk encryption, the pattern is envelope encryption. You ask KMS for a data key, it returns the key in plaintext plus a copy encrypted under a master key that never leaves the HSM. You encrypt the data locally, store the encrypted data key next to it, and discard the plaintext key. The data keys do pass through your app’s memory briefly, so this isn’t the same guarantee as signing inside the HSM. The master key, the one that unlocks everything, stays put.

    An HSM is still a signing oracle

    This has a limit. If an attacker owns the application, they can’t steal the key, but they can ask the HSM to use it. A compromised CI runner with permission to call kms:Sign can sign malware with your release key for as long as it keeps access. What you’ve bought is that the abuse stops the moment you evict the attacker, and that every use is logged, instead of a stolen key that works from anywhere, forever.

    So the HSM has to come with the controls that make that log useful. Give each key a single purpose and narrow IAM permissions, so the web tier can’t touch the release key. Alert on unusual usage, since KMS calls land in CloudTrail and a signing key used 400 times at 3 a.m. should page someone. Require quorum approval (M of N administrators) for key export, deletion or policy changes on hardware that supports it. Keep key creation and key use in different roles.

    Where I’d start

    Not everything needs an HSM. Session cookie keys that rotate hourly probably don’t justify the latency. Root CA keys, code signing keys, token signing keys for an identity provider, and the master keys for encrypted data at rest absolutely do. Those are the keys where one leak means rebuilding trust from scratch, and they’re also the ones that are used rarely enough that a network call per operation doesn’t matter. Put those in an HSM first.

  • auditd and what to log so an investigation is possible

    auditd and what to log so an investigation is possible

    Part 3 of 4 in the Hardening a Linux server series. Earlier parts: Part 1, SSH hardening and Part 2, systemd sandboxing.

    The first question in almost every Linux intrusion investigation is “what did they run?”, and on most servers the answer is “no idea”. Shell history is a file the attacker controls; clearing it is common enough to have its own MITRE ATT&CK entry (T1070.003). The application logs show the request that got them in and then nothing. The auth log shows a sudo or two. Everything in between is gone.

    The Linux audit subsystem fixes that, and it’s been in the kernel since 2.6. The kernel emits records for the events you ask about, auditd writes them to disk, and the records carry the one field that makes them worth having: the audit UID.

    Why auid is the whole point

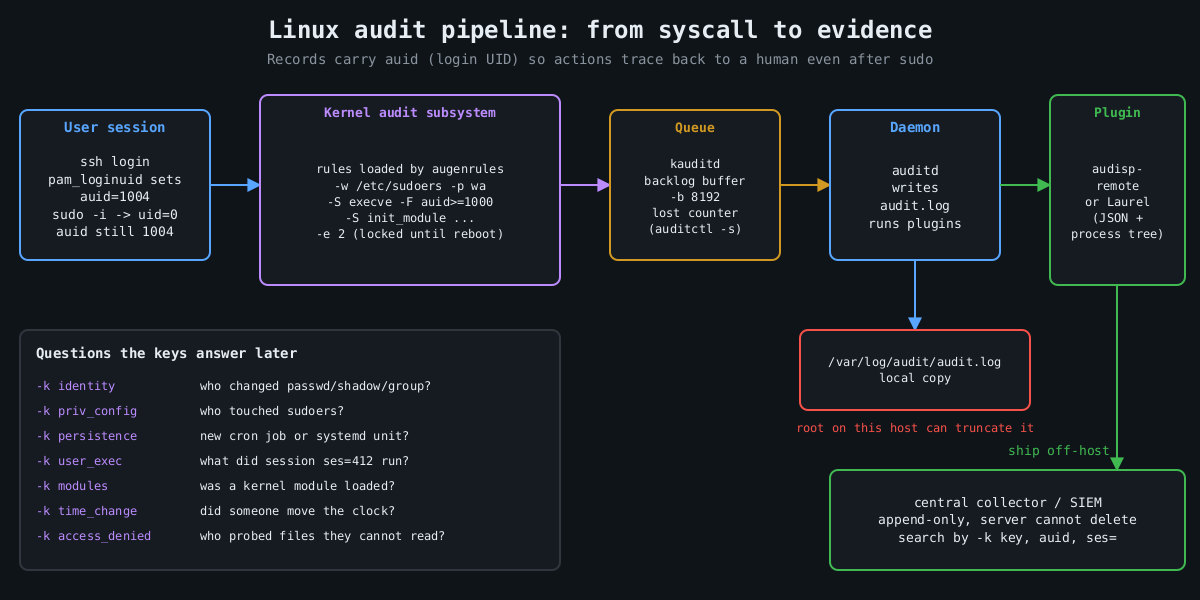
    Pipeline diagram: user session with auid, kernel audit rules, kauditd backlog, auditd writing audit.log, plugins shipping events to an append-only central collector

    When a user logs in, pam_loginuid stamps their session with a login UID, auid in audit records. It survives sudo, su, setuid binaries and daemonizing. So when someone runs sudo -i and then deletes a log file, the event says uid=0 and also auid=1004, which is the human who logged in. Syslog can’t give you that.

    Services started by systemd at boot have no login UID. Unset shows up as 4294967295 (newer auditctl also accepts unset). Filtering on auid>=1000 -F auid!=4294967295 therefore means “actions traceable to a human session”, which is how you keep the volume sane.

    A rule set that answers real questions

    Rules live in /etc/audit/rules.d/*.rules and are compiled by augenrules --load. Here is a compact starting point. I’m not trying to be exhaustive; Florian Roth’s public auditd rule set on GitHub is a good, much longer reference.

    ## buffer and failure behaviour
    -D
    -b 8192
    --backlog_wait_time 60000
    -f 1
    
    ## identity and privilege configuration
    -w /etc/passwd -p wa -k identity
    -w /etc/shadow -p wa -k identity
    -w /etc/group -p wa -k identity
    -w /etc/sudoers -p wa -k priv_config
    -w /etc/sudoers.d/ -p wa -k priv_config
    -w /etc/ssh/sshd_config -p wa -k sshd_config
    -w /etc/ssh/sshd_config.d/ -p wa -k sshd_config
    
    ## persistence locations
    -w /etc/cron.d/ -p wa -k persistence
    -w /etc/crontab -p wa -k persistence
    -w /var/spool/cron/ -p wa -k persistence
    -w /etc/systemd/system/ -p wa -k persistence
    -w /root/.ssh/ -p wa -k persistence
    
    ## commands run by humans (both ABIs)
    -a always,exit -F arch=b64 -S execve -F auid>=1000 -F auid!=4294967295 -k user_exec
    -a always,exit -F arch=b32 -S execve -F auid>=1000 -F auid!=4294967295 -k user_exec
    
    ## kernel modules, time, tracing
    -a always,exit -F arch=b64 -S init_module -S finit_module -S delete_module -k modules
    -a always,exit -F arch=b64 -S adjtimex -S settimeofday -S clock_settime -k time_change
    -a always,exit -F arch=b64 -S ptrace -k tracing
    
    ## access denied to humans
    -a always,exit -F arch=b64 -S open -S openat -S truncate -S ftruncate -F exit=-EACCES -F auid>=1000 -F auid!=4294967295 -k access_denied
    -a always,exit -F arch=b64 -S open -S openat -S truncate -S ftruncate -F exit=-EPERM -F auid>=1000 -F auid!=4294967295 -k access_denied
    
    ## lock the configuration until reboot
    -e 2

    Every rule has a -k key. That’s what you search by later, and it’s what your SIEM will alert on. Name them for the question they answer.

    The arch=b32 execve rule is there on purpose. A 64-bit kernel with 32-bit compatibility still accepts 32-bit syscalls, and a rule that only matches b64 misses a statically linked 32-bit binary entirely. Older hardening benchmarks list both for this reason.

    Choices that matter more than the rules

    -e 2 makes the audit configuration immutable until the next reboot. Without it, an attacker who gets root runs auditctl -D and your logging stops silently. With it, they have to reboot the machine to change the rules, and a reboot is loud.

    -f sets what happens when the kernel can’t log: 0 is silent, 1 logs a kernel message, 2 panics the machine. Panic-on-audit-failure sounds strict and is occasionally a compliance requirement, but on most servers it hands an attacker who can flood the audit backlog a way to crash the box. I use 1 and alert on lost events instead. auditctl -s shows the lost counter, and it should stay at zero.

    -b and --backlog_wait_time size the kernel buffer and how long a process blocks when that buffer is full. Too small and you drop events during a burst, which is exactly when the attacker is busy.

    The other problem is volume. Full execve logging on a build server or a box running a lot of short-lived processes generates enormous logs. That’s why the rule above only covers human sessions. If a service account matters (the one your web app runs as, say), add a targeted rule with -F uid= for that account rather than logging every process on the machine.

    Reading it back

    Raw audit.log is famously unpleasant, one event split across several records. ausearch stitches them together and -i translates numeric IDs to names:

    ausearch -k user_exec --start today -i
    ausearch -k identity -ts 10/09/2026 06:00:00 -i
    aureport -x --summary
    aureport --login --failed

    For anything beyond a single host, send the records somewhere else. The audisp-remote plugin ships them over the network to a central auditd, or you can have a log shipper tail the file. Laurel, a plugin from the threathunters.io folks, rewrites the multi-record mess into one JSON line per event with the process tree attached, which SIEMs handle much better.

    Following a session

    This is where the keys and the auid field earn their keep. Say the persistence key fires because something wrote into /etc/cron.d/. The event shows the executable that did the write, the working directory, auid, and a ses= value, which is the kernel’s ID for that login session. That session number is the thread you pull:

    ausearch -k persistence --start recent -i
    ausearch --session 412 --raw | aureport -x -i
    ausearch -ua 1004 --start today -k user_exec -i

    The second command lists every executable that login session ran, in order, including the ones run through sudo. In practice that’s the difference between “someone added a cron job” and “this account logged in from this address, downloaded this file, ran it as root, then added a cron job”, which is the story an incident report needs.

    The things auditd doesn’t cover

    A few other things help too. Make the journal persistent (Storage=persistent in journald.conf), otherwise it lives in /run and disappears at reboot. Set LogLevel VERBOSE in sshd so logins record the key fingerprint, as covered in part 1. Make sure every host runs chrony or another NTP client, because an investigation across five machines with clocks four minutes apart turns into an argument about ordering.

    And send everything off the host quickly. Logs that sit only on the compromised machine are evidence the attacker can edit. The immutable flag stops them changing the rules. It doesn’t stop root from truncating /var/log/audit/audit.log after the fact. A remote copy that the server can append to and never delete from is what turns these logs into evidence.

    The last part of this series covers patching, which is the better way to avoid needing most of these investigations.

    Other parts of the Hardening a Linux server series: Part 1: SSH hardening beyond “disable root login”, Part 2: Least privilege with systemd sandboxing, Part 4: Patching without fear.

  • Least privilege with systemd sandboxing

    Least privilege with systemd sandboxing

    Part 2 of 4 in the Hardening a Linux server series. Previously: Part 1, SSH hardening beyond “disable root login”.

    Most services on a Linux box run with far more access than they need. A web app that reads a config file, writes to one data directory and listens on one port can, by default, read most of the filesystem, write anywhere its user owns, call every syscall the kernel offers and open any kind of socket. When that app gets popped through a deserialization bug, all of that becomes the attacker’s starting position.

    systemd has grown a large set of sandboxing directives that fix this with a few lines in a unit file. No containers, no AppArmor profiles to maintain, no code changes. I think they’re the best return on effort in Linux hardening right now, and they’re still rarely used outside of the units systemd itself ships.

    Measure first

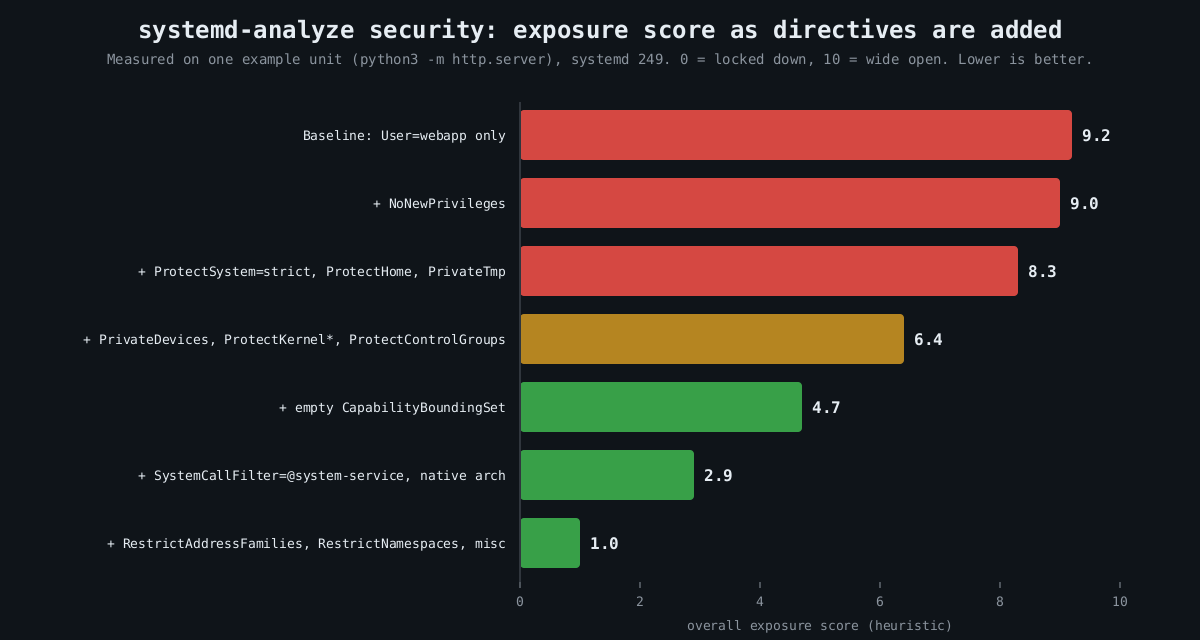
    Bar chart: measured systemd-analyze security exposure score falling from 9.2 at baseline to 1.0 as filesystem, kernel, capability, syscall and network restrictions are added

    systemd-analyze security scores every running service from 0 (locked down) to 10 (wide open) and lists each check it applied:

    systemd-analyze security
    systemd-analyze security nginx.service

    The number is a heuristic, a weighted sum of which directives are set, so don’t treat 2.1 versus 2.4 as meaningful. It is very good at showing you the gaps. On most distributions the bulk of third-party services score 9 or above.

    Measured: one unit, hardened step by step

    I took a trivial unit (python3 -m http.server running as a dedicated user) and added directives in groups, scoring each version with systemd-analyze security on systemd 249. The chart near the top of this post shows the result. The baseline scored 9.2. The final unit scored 1.0.

    Here is roughly what that final unit looks like, adjusted for a real service:

    [Service]
    ExecStart=/opt/webapp/bin/webapp
    DynamicUser=yes
    StateDirectory=webapp
    ConfigurationDirectory=webapp
    
    NoNewPrivileges=yes
    ProtectSystem=strict
    ProtectHome=yes
    PrivateTmp=yes
    PrivateDevices=yes
    ProtectKernelTunables=yes
    ProtectKernelModules=yes
    ProtectKernelLogs=yes
    ProtectControlGroups=yes
    ProtectClock=yes
    ProtectHostname=yes
    ProtectProc=invisible
    
    CapabilityBoundingSet=CAP_NET_BIND_SERVICE
    AmbientCapabilities=CAP_NET_BIND_SERVICE
    
    SystemCallArchitectures=native
    SystemCallFilter=@system-service
    SystemCallFilter=~@privileged @resources
    SystemCallErrorNumber=EPERM
    
    RestrictAddressFamilies=AF_UNIX AF_INET  ""AF_INET6
    RestrictNamespaces=yes
    RestrictSUIDSGID=yes
    RestrictRealtime=yes
    LockPersonality=yes
    MemoryDenyWriteExecute=yes
    UMask"" =0077

    That looks like a lot. Each line is cheap, though, and they fall into a few families.

    Privilege escalation inside the service

    NoNewPrivileges=yes sets the kernel’s no_new_privs flag, so nothing the service executes can gain privileges through setuid binaries or file capabilities. An attacker with code execution as the service user can’t then run a vulnerable setuid helper to become root. Several other directives quietly turn it on as well, which is fine.

    Capabilities are the other half. CapabilityBoundingSet= with an empty value drops every capability for good. The example keeps exactly one, CAP_NET_BIND_SERVICE, and grants it as an ambient capability so a non-root process can bind port 443. That is the right shape for most daemons that historically started as root just to grab a low port.

    DynamicUser=yes allocates a throwaway UID when the service starts. It implies a stricter set of defaults (read-only system, private /tmp, no setuid), and combined with StateDirectory= systemd creates and chowns /var/lib/webapp for you. If the service doesn’t need a stable UID shared with other software, use it.

    Filesystem view

    ProtectSystem=strict mounts the entire filesystem read-only for the service, apart from the API filesystems like /proc and /sys. Writable paths are then opt-in through StateDirectory=, CacheDirectory=, LogsDirectory= or ReadWritePaths=. This is the directive that stops an attacker dropping a cron job, a systemd unit or a modified binary for persistence. ProtectHome=yes hides /home, /root and /run/user entirely, which matters more than people think, since home directories are where SSH keys and cloud credentials live.

    PrivateTmp=yes gives the service its own /tmp, which closes off the classic symlink and race games other local users can play in a shared /tmp.

    Kernel attack surface

    A sandbox that lives in userspace can’t save you from a kernel bug, but it can make most kernel bugs unreachable. SystemCallFilter=@system-service is an allowlist of syscalls that ordinary services use, curated by systemd. The second line then removes @privileged and @resources. By default a blocked syscall kills the process with SIGSYS; SystemCallErrorNumber=EPERM makes it fail with an error instead, which is friendlier while you’re tuning.

    RestrictNamespaces=yes deserves a specific mention. A good number of recent Linux privilege escalation bugs are only reachable by unprivileged users through user namespaces, because creating one hands you capabilities inside it. CVE-2022-0185, a heap overflow in the filesystem context code, is the textbook case: exploitation needed CAP_SYS_ADMIN in a user namespace, which any unprivileged user could get on distributions that allowed unprivileged user namespaces. A service that can’t create namespaces can’t reach that code path at all.

    PrivateDevices=yes, ProtectKernelModules=yes and ProtectKernelTunables=yes take away raw device nodes, module loading and writes to /proc/sys. SystemCallArchitectures=native blocks the 32-bit syscall ABI on 64-bit hosts, a path that has been used to dodge seccomp filters written for one ABI only.

    Network

    RestrictAddressFamilies= limits which socket types the service may open. Most need AF_UNIX, AF_INET and AF_INET6, nothing else, and certainly not AF_PACKET or AF_NETLINK. If you want per-service egress control, IPAddressDeny=any with a narrow IPAddressAllow= uses a cgroup BPF filter to drop traffic to anything else. A compromised internal API that can’t reach the internet is a lot less useful as a staging point.

    Rolling it out without breaking things

    Don’t edit vendor units. Use systemctl edit webapp.service to write a drop-in under /etc/systemd/system/webapp.service.d/, which survives package upgrades. You can try options on a throwaway command before committing to them:

    sudo systemd-run --pty --wait -p ProtectSystem=strict -p PrivateTmp=yes \
      -p SystemCallFilter=@system-service /opt/webapp/bin/webapp --selftest

    The usual breakage is predictable. MemoryDenyWriteExecute=yes breaks anything with a JIT, so Node, the JVM and PCRE’s JIT mode will fail in confusing ways. ProtectSystem=strict breaks services that write somewhere surprising, which the journal will show as EROFS errors. Syscall filters occasionally catch a library doing something unusual, and with SystemCallErrorNumber=EPERM the audit log or strace -f tells you which call. Add one family at a time and run your integration tests between each.

    This doesn’t replace patching or a proper MAC policy, and it isn’t a VM boundary. What it does is shrink the blast radius of the next RCE in your app from “the box” to “one directory and a socket”. Part 3 covers auditd, so that when something does get through you can see what it tried to do.

    Other parts of the Hardening a Linux server series: Part 1: SSH hardening beyond “disable root login”, Part 3: auditd and what to log, Part 4: Patching without fear.